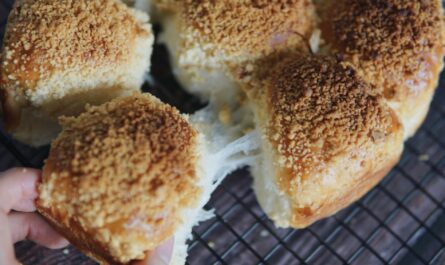
It’s that time of the year when those familiar spiced buns are popping up everywhere – at bakeries and on my social media feed. Yup, it’s officially hot cross bun season!
If you’re anything like me, that first whiff of cinnamon and nutmeg in the air instantly ignites a craving. But this year, we’re taking things up a notch. Beyond the classic fare – my taste buds were yearning for something with more of a kick.
And that’s how I came up with these Earl Grey Cardamom Hot Cross Buns.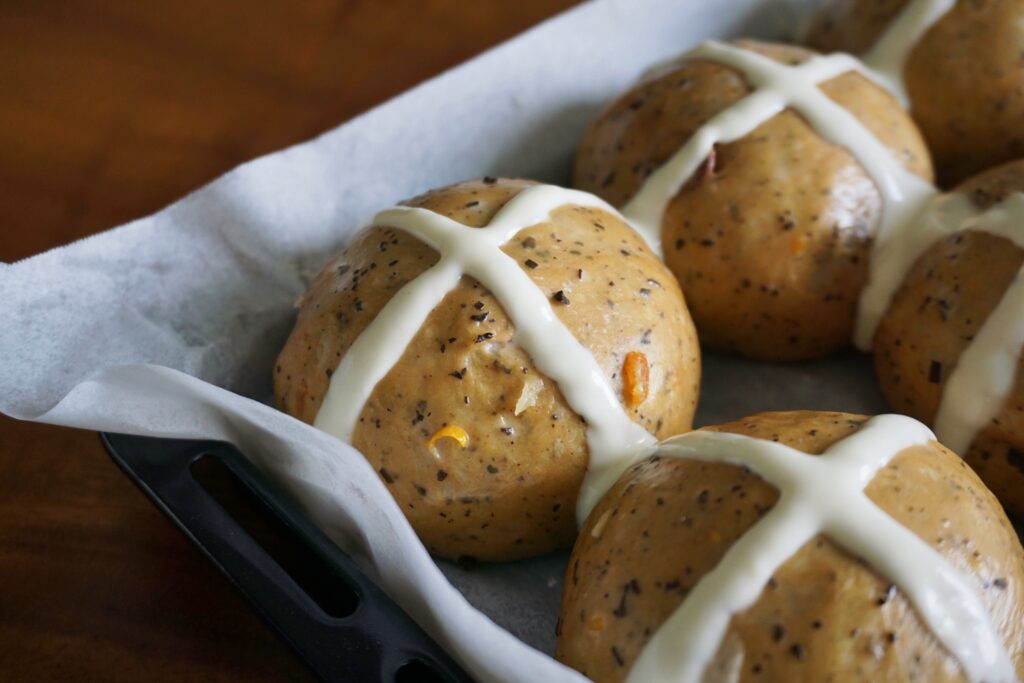
Spiced Earl Grey Blend
Using my all-time favourite tea, Earl Grey, infused right into the dough, then amplified with cardamom, alongside the classic hot cross bun spices – cinnamon and nutmeg.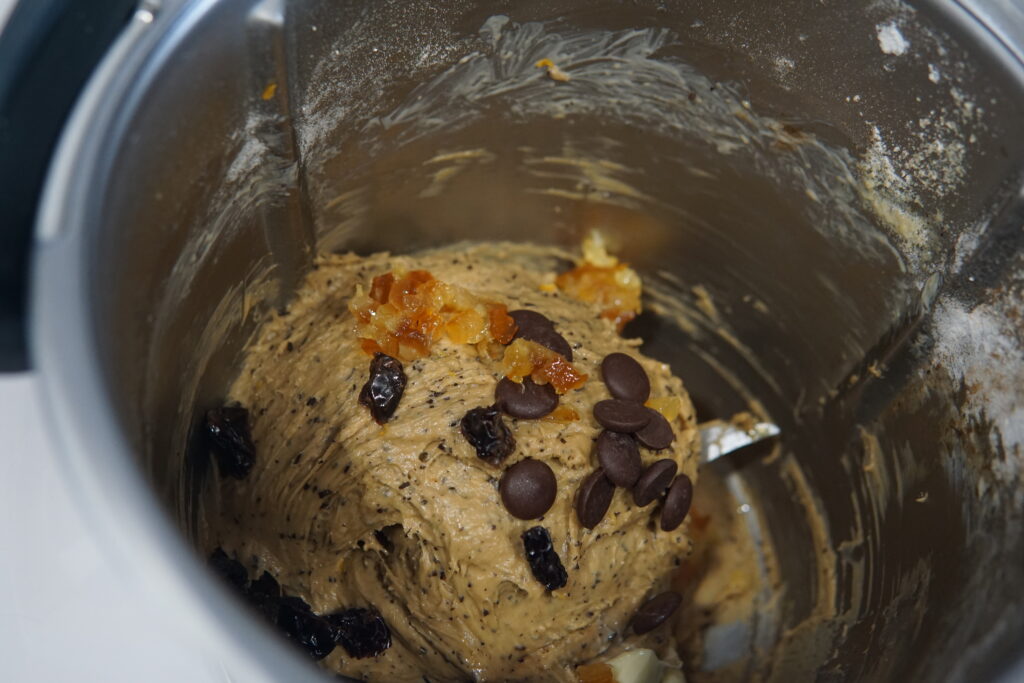
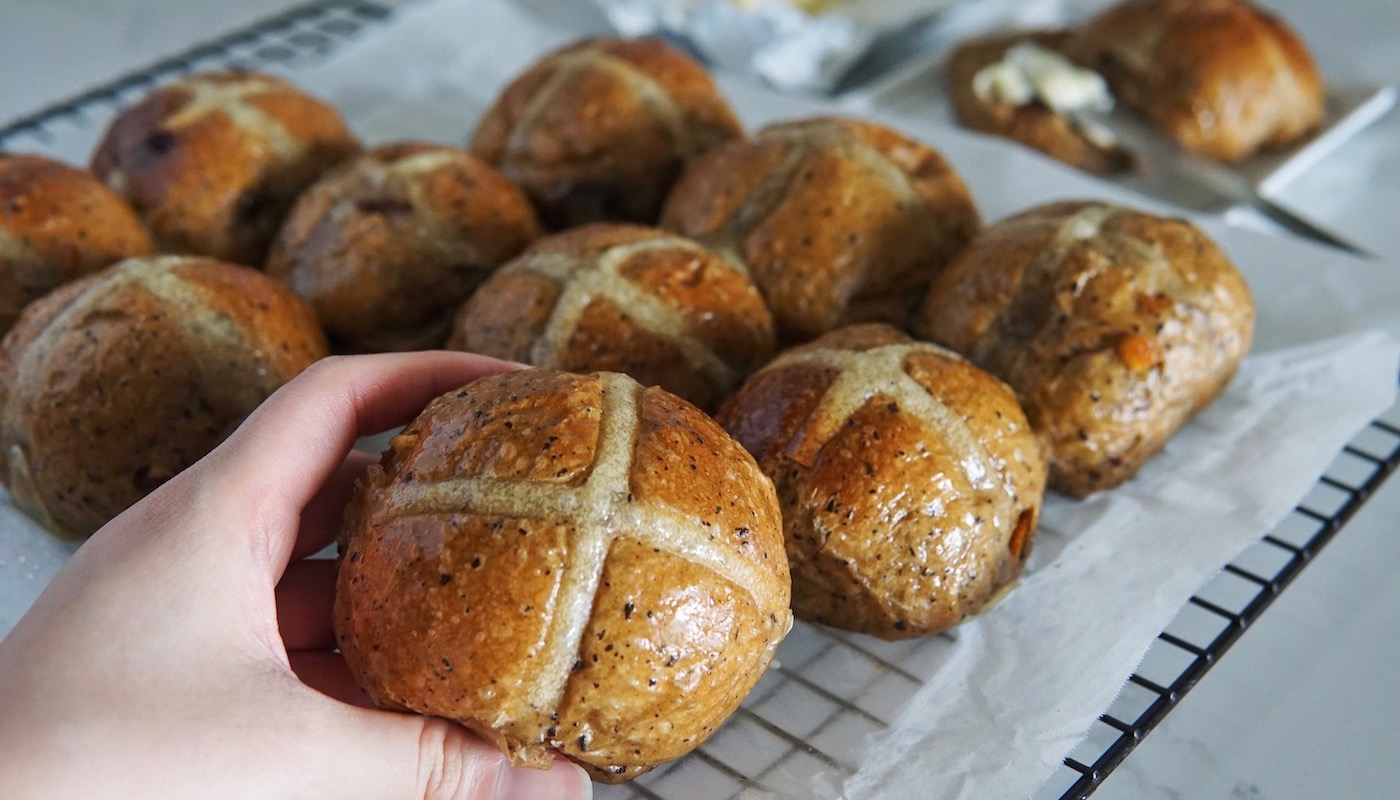
How to Shape Hot Cross Buns?
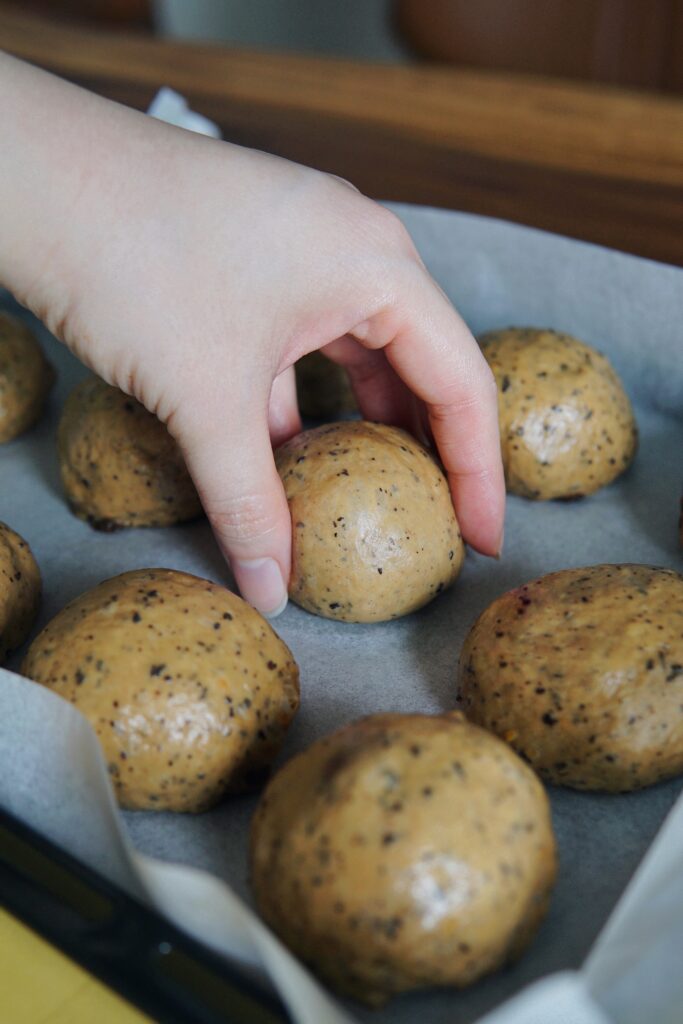
After the dough has completed its first round of proofing, we would then deflate dough and divide into 12 equal pieces. Gather each individual dough and shape into round balls. Then place into a lined/greased 9×13 inch baking pan. Each dough weighs approximately 55-56g, which I find is the perfect size for one hot cross bun.
Then come round two of the waiting game: another 35-40 minutes for the dough to double in size during its second proof. With about 15 minutes left on the clock, I preheat the oven to 180°C, and whisk together the flour paste for those iconic crosses.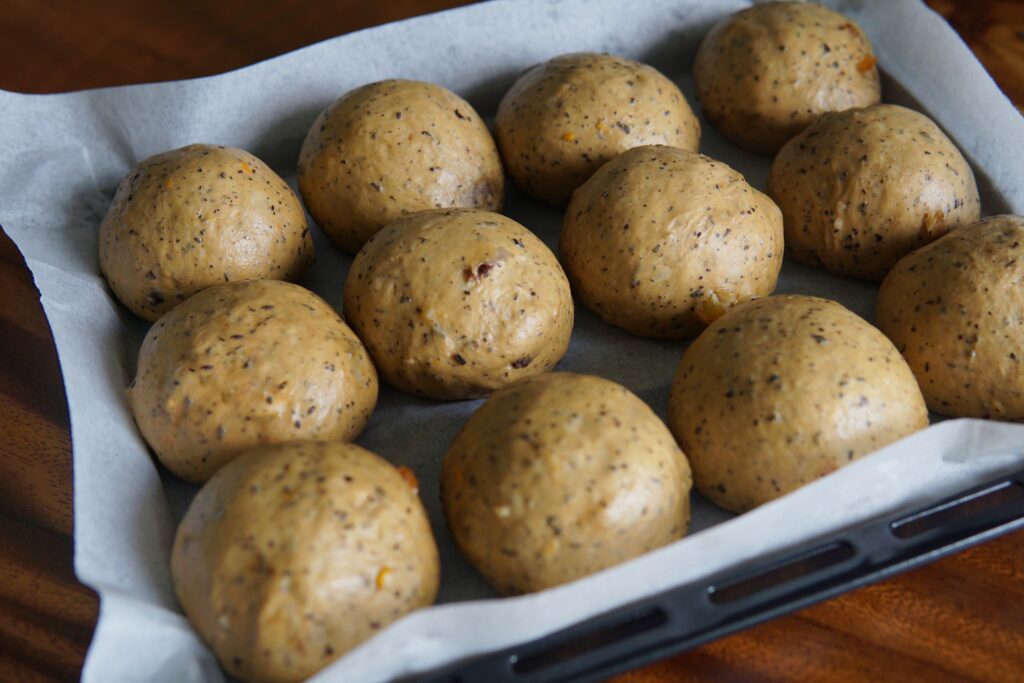
Crosses on Hot Cross Buns
To complete your hot cross buns, you will of course need the cross! It’s basically a mix of flour and water mixed into a paste, then piped on top of each bun before baking. All you need is a piping bag (piping nozzle not required) or even a zip lock bag. I find it helpful to place the bag in a tall glass to hold the bag whilst you fill the bag with the flour paste.
Snip the corner off and you’re good to start piping. After baking, the “flour cross” does harden a little. Usually I prefer a slimmer cross. You can most definitely cut a slightly bigger hole on your piping bag to achieve thicker crosses.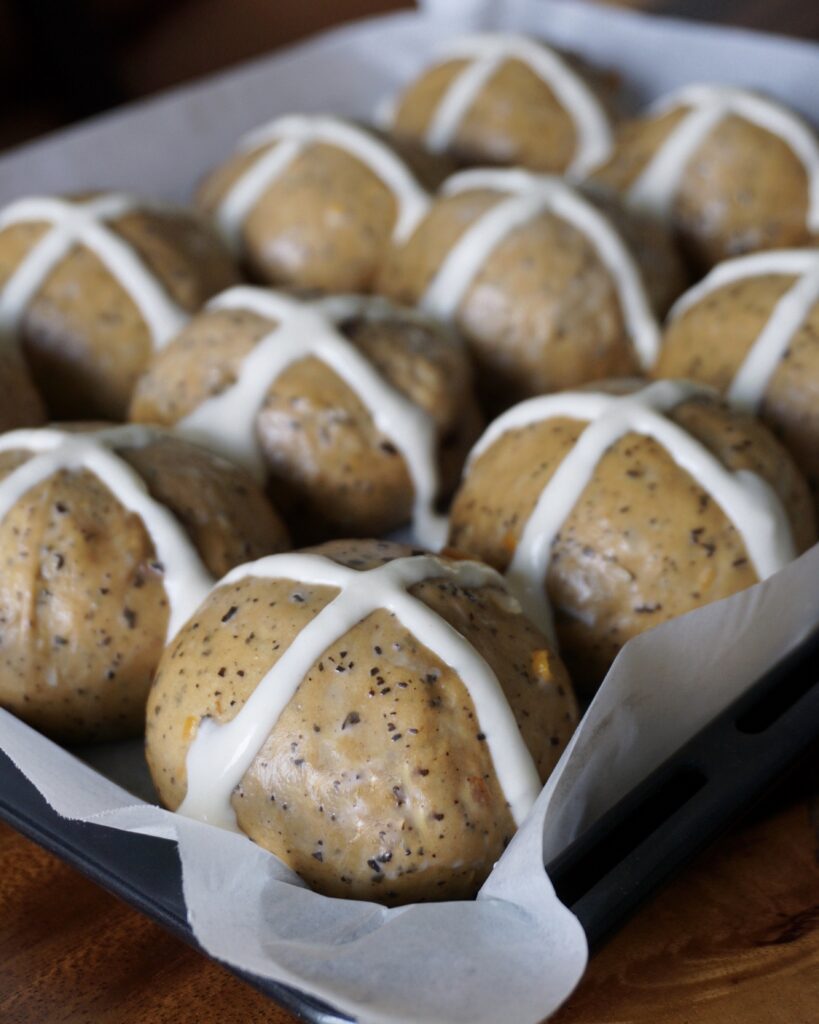
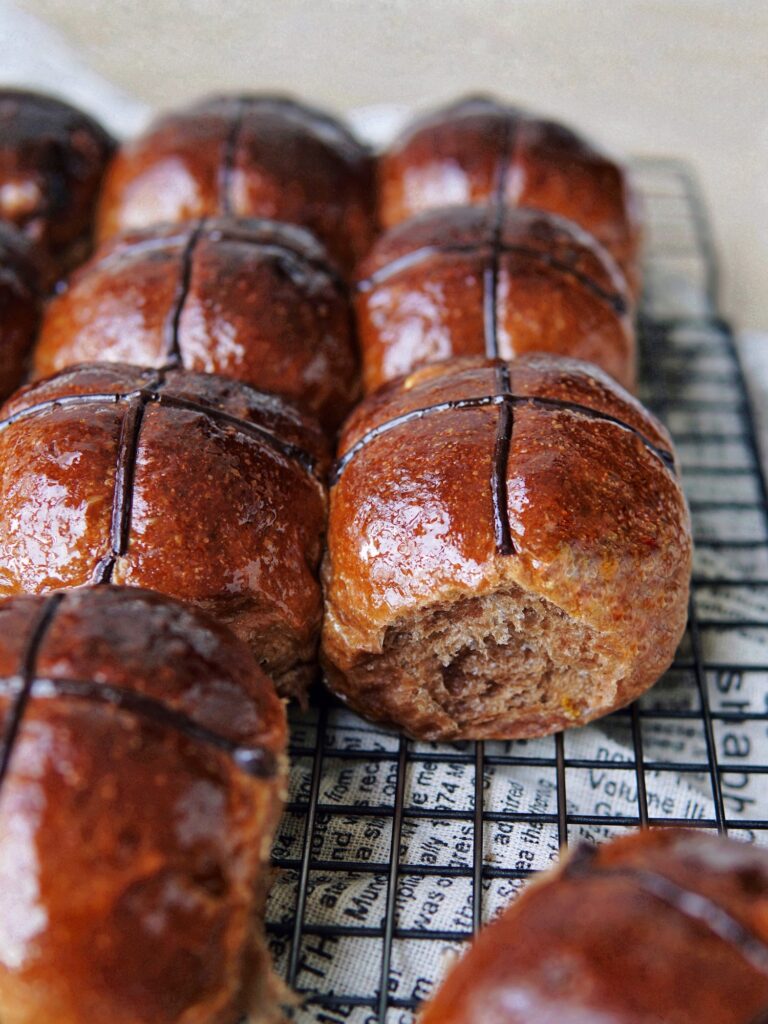
The aroma alone while these bake is absolutely intoxicating, a truly irresistible blend that promises a flavor experience you won’t soon forget. Trust me, this is one amazing combo you need to try.
So there you have it – a twist on a beloved classic that’s bursting with a divine combination of flavours. These Earl Grey Cardamom Hot Cross Buns will be such a treat. Your kitchen will smell SO amazing!
The delicate floral notes of the Earl Grey, the bright, citrusy lift of bergamot, and the warm, slightly peppery embrace of cardamom blends beautifully with the traditional hot cross bun spices.
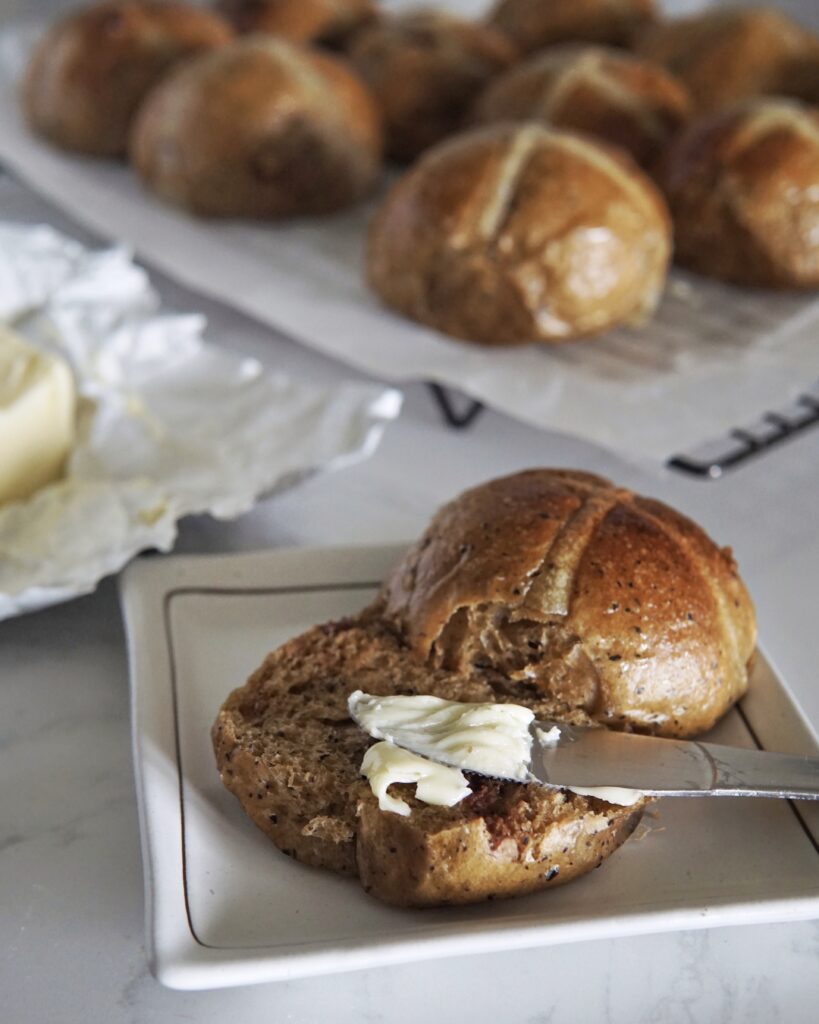
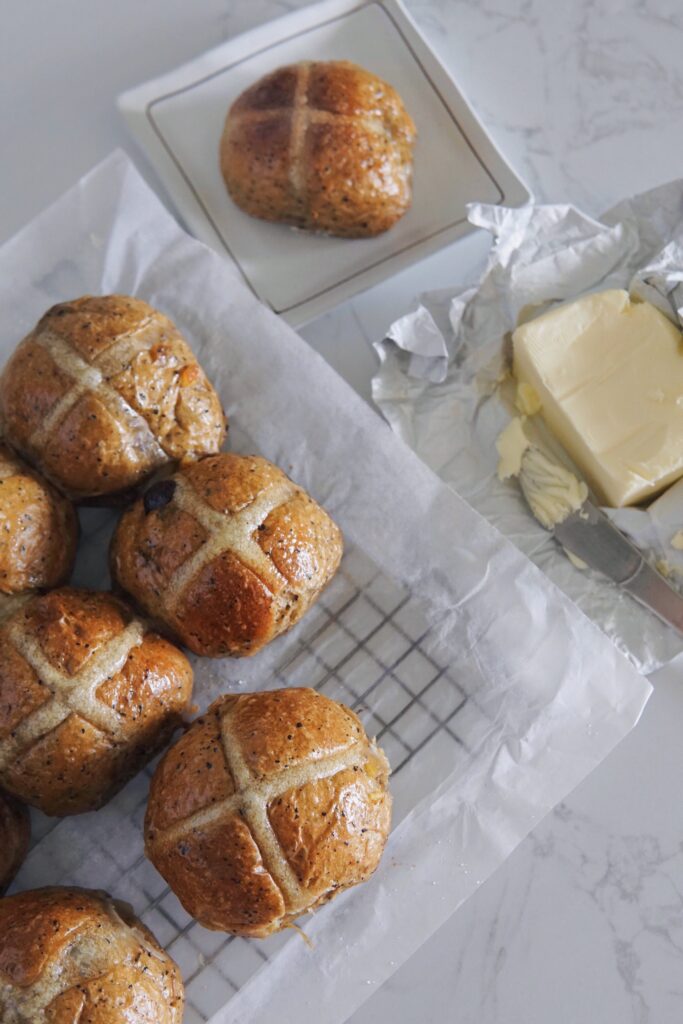
They’re lovely to enjoy as it is whilst it’s soft and fluffy, or if you prefer, toasted with a spread of butter. Either way, I truly hope you enjoy them as much as I do.
If you’re looking to elevate your hot cross bun baking, give this recipe a try! Go ahead, and fill your kitchen with that incredible aroma and treat yourself (and maybe a few lucky others!) to a batch of these Earl Grey Cardamom hot cross buns. I promise you, you won’t regret it!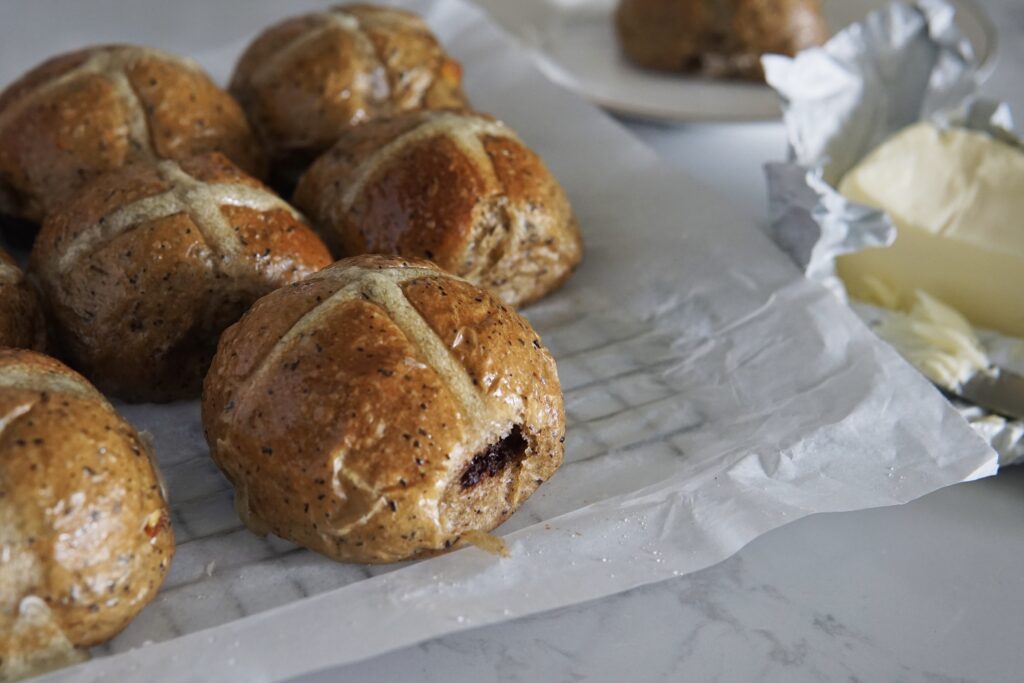
Earl Grey Cardamom Hot Cross Buns
Ingredients
Tangzhong
- 20 g high protein bread flour
- 100 g water
- 6 g earl grey tea leaves
Dough
- 50 g milk chilled
- 30 g whipping / heavy cream chilled
- 30 g castor sugar
- zest of an orange
- 1 egg
- ¼ tsp salt
- 260 g high protein bread flour
- 10 g earl grey powder
- 1 tbsp milk powder
- 1 tsp ground cardamom
- 1 tsp ground cinnamon
- ½ tsp nutmeg powder
- 1 tsp yeast
- 30 g unsalted butter room temperature
- 10 g milk optional for wash
Inclusions
- 30 g raisins
- 30 g orange peel
- 20 g dark chocolate callets
Cross
- 40 g flour
- 30-40 ml water
Sugar Glaze
- 3 tbsp sugar
- 3 tbsp water
Instructions
Please note that I have included two methods below for tangzhong making and dough kneading using either the Thermomix or conventional bread machine so do take note of the sub-headings.
TANGZHONG & DOUGH KNEADING (Thermomix Method)
- To make the tangzhong, place 20g high protein flour, 100g water and 6g of earl grey tea leaves in mixing bowl, cook for 3min/80°C/spd 3 and let stand for 15-20 minutes until temperature lowers down to 40°C.
- Add remaining ingredients in dough except butter, then knead 4 min.
- Add butter, knead 1 min.
- Add inclusions, knead 20 secs.
TANGZHONG & DOUGH KNEADING (Conventional Method)
- Prepare tangzhong by mixing 20g high protein flour, 100g water and earl grey tea together in a pot, ensuring the mixture is well combined with no lumps. Cook over medium-low heat, stirring consistently to prevent burning and sticking while you cook.
- The mixture will gradually become thicker. Once you notice that some “lines” appear in the mixture for when you stir with the spoon, it’s done. Your tangzhong is ready.
- Transfer into a clean bowl. Cover with a cling wrap sticking onto the surface of tangzhong to prevent it from drying up. Let cool.
- Add all ingredients under Dough (except butter) into breadmaker; first the wet ingredients including cooled Tangzhong, then followed by the dry ingredients.
- Select "dough" mode and let knead until all ingredients come together, usually I let it knead for approximately 8-9 minutes.
- Then add in the butter, continue kneading until the dough is smooth and elastic. Add inclusions in during the last 3-4 minutes. The total time of kneading in my breadmaker is approximately 20-25 minutes. Check if you have achieved windowpane.
BULK FERMENTATION (FIRST RISE)
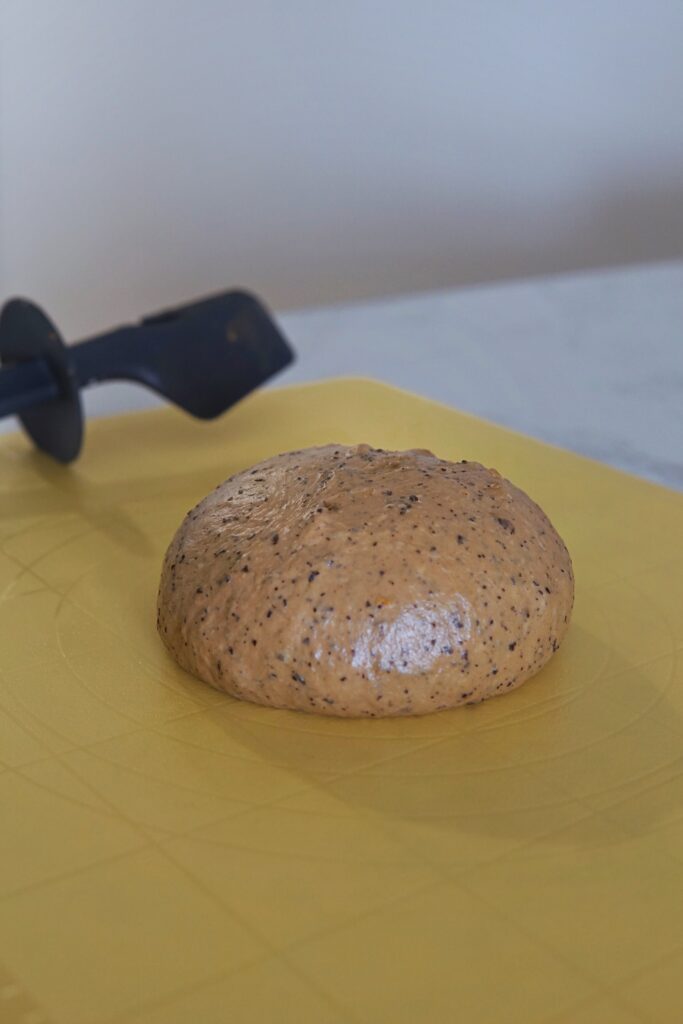
- Transfer dough to pastry mat, shape into ball and let proof in a warm place covered loosely with cling wrap or damp towel until doubled in size (approx. 45-60 minutes).
DOUGH SHAPING & SECOND RISE
- Grease and line a 9×13" baking pan using baking paper with 1-2 inches overhang.
- After dough has doubled in size, punch down to deflate. Divide dough into 12 equal portions weighing approx 55-56g each.
- Take one portion and press down with palm, then gather the sides to the center forming a ball. Then using the corner of your palms at a 45 degree angle, perform chaffing method by pressing dough downwards whilst rotating dough. This helps to stretch dough to get a nice, taut round ball with smooth surface.
- Place the ball seam side down on the baking pan and repeat with remaining dough. Line them up 4 x 3 in the pan.
- Let dough rise for its 2nd round of proofing, until double in size. This takes another 35-40 minutes. During the last 15 minutes, preheat oven to 180°C and prepare flour paste for crosses.
CROSSES
- Mix flour and water in a small bowl until a thick runny paste forms.
- Spoon into a piping bag or ziplock bag then snip off corner, approx a small 2mm-3mm round size.
- Brush milk wash on the buns, then pipe a line down the middle of each row of buns. Repeat in the other direction to create crosses.
BAKING & GLAZING
- Bake at 180°C for 18-20 mins until golden brown.
- Whilst buns are baking, prepare sugar syrup. Combine sugar and water in a small saucepan and bring it to the boil. If using Thermomix, heat for 2 mins/100°C/Speed 3 without MC.
- Remove buns from oven. Use overhang to lift buns from pan onto a cooling rack then brush sugar glaze on buns. Let cool for 10 minutes, then enjoy warm!
- Store completely cooled buns in air tight container – they can stay in room temp for up to 2-3 days or refrigerated up to 1 week.
Notes
Here’s a snippet of the making of these Earl Grey Cardamom Hot Cross Buns on my Instagram @thebakeanista:
View this post on Instagram
Not into Earl Grey? Not a problem!
I get it, Earl Grey isn’t for everyone (though you’re truly missing out on some serious aromatic magic!), but the cravings for a perfectly spiced hot cross bun remains universal.
If earl grey is not your cuppa tea (pun not intended), then I have a soft and fluffy Chocolate Orange Hot Cross Buns recipe that you might enjoy. Infused with orange juice, the deliciously spiced dough is packed with cocoa powder, raisins, sultanas, orange zest and orange peel for a citrusy kick, and a hint of vanilla extract for extra flavour.
In that same post, I have also shared some tips for tweaks and variations. Perhaps you’re also not a fan of chocolate, you can swap cocoa powder for milk powder for a classic hot cross buns recipe and if you may, turn it into a loaf like I did.
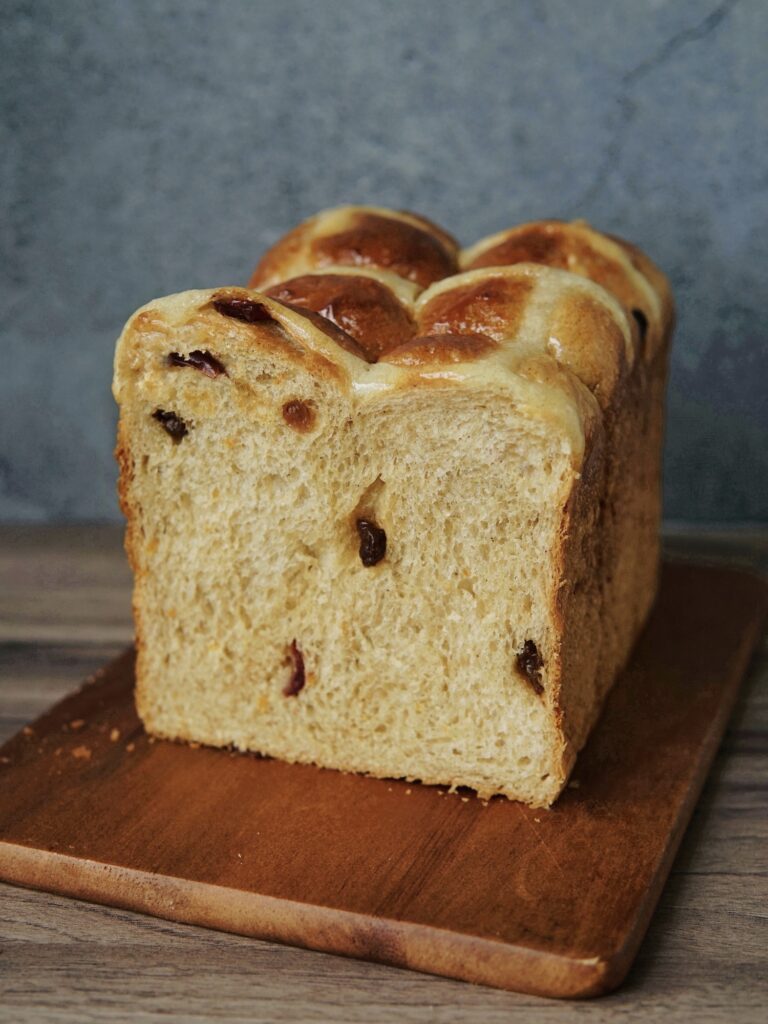
I love this loaf version too! It’s the convenience of being able to toss the slices into the toaster, and slather on a more generous amount of butter. I mean… Why not, right? 
If Experiencing Sticky Dough
For bread maker users, check the dough 10 minutes into the kneading cycle. It should be smooth and the mixing bowl should be clean by now. If your dough is too sticky to manage, you may add 1 tbsp of bread flour at a time.
For Thermomix users, if you experience a stickier dough, you may want to add 1 tbsp of bread flour at a time and knead for 15-20 seconds until incorporated.
Lightly oil your hands (and the pastry mat depending on how sticky your dough is) using neutral flavoured oil to shape dough into a ball. Apply the chafing technique by cupping your hands gently around the dough, apply a light, downwards pressure to the sides whilst simultaneously rotating the dough in a circular clockwise motion. Continue doing so until a smooth, even, and round ball is formed.
How do I know if my bread is well proofed and ready to be baked?
You may perform the visual test to check. Lightly press the surface of the proofed dough with the tip of your finger for about 2 seconds and observe how fast the dough bounces back up.
- UNDER-PROOF: If it bounces back up too fast without any indentation, it isn’t ready yet, so give it more time.
- READY TO BAKE: It is supposed to bounce back up slowly, about halfway up and leave a slight indent.
- OVER-PROOFED: If the indent remains without bouncing back up, yes it is over-proofed, but don’t worry! You can still save it.
How to save an over-proofed bread dough?
If the dough is over-proofed, the gluten is being over-stretched and it will be unable to hold up the internal structure of the bread. The buns may collapse on its side. If it isn’t severely over-risen, you have the option to quickly pop it into the oven to bake it right away. Otherwise what you can do to save it is by deflating your over-proofed dough and reshape, then repeat the second proofing again.
Which oven rack and what oven setting should I use?
I suggest the second rack from bottom. I bake using top and bottom heat, with fan.
Few Things to Note
When it comes to bread making, there are many factors that will influence your dough and the end product. Recipes should be used as a guide, as you familiarize yourself with the process and dough.
For instance, your dough may require extra kneading time depending on the flour and its protein content. The method used to knead also needs to be taken into account as some machines work the dough quicker, whilst others may require a bit more kneading time.
Temperature and humidity plays a big part in how your dough rises. The amount of time required to proof your dough also varies depending on where you’re based at. For proofing, if the weather is a bit chilly/cold where you are, I suggest heating up a cup of water in the microwave for 60 seconds, then leave dough inside the microwave to rise. If your oven heats up to 40°C, you may also let dough rise in oven with a cup of water.
It’s also very important to try to get to know your oven, as every oven is different. My oven heats up quickly so when a recipe calls for 180-190°C, I sometimes have to drop it down to 160-170°C depending on which rack I use. Keep an eye out as the bread is baking. Adjust either the baking temperature or duration according to how your oven behaves.
Have you tried this recipe? Leave a comment below or tag me @thebakeanista on Instagram to let me know how you went. IF YOU ENJOYED THIS RECIPE, YOU MAY ALSO WANT TO CHECK OUT OTHER DELICIOUS RECIPES HERE.