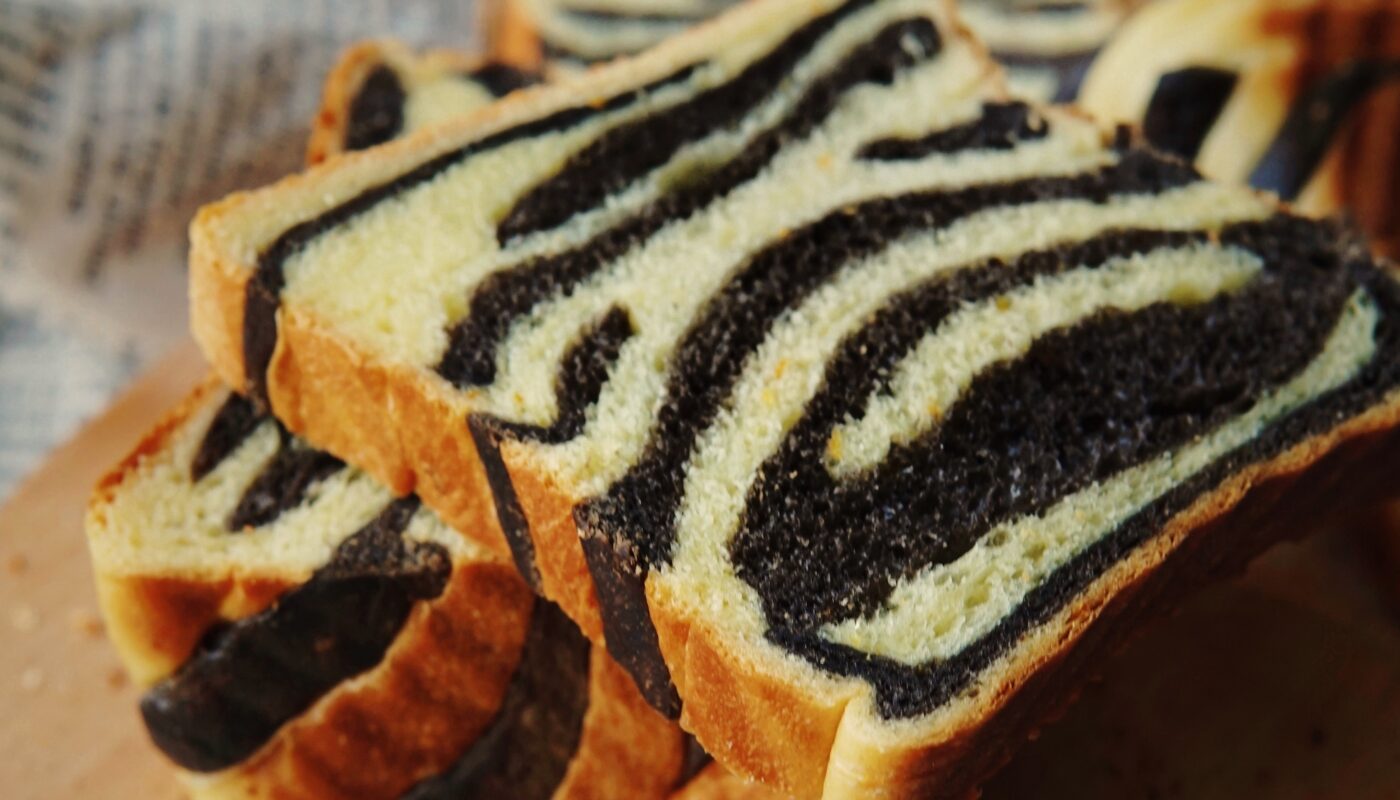
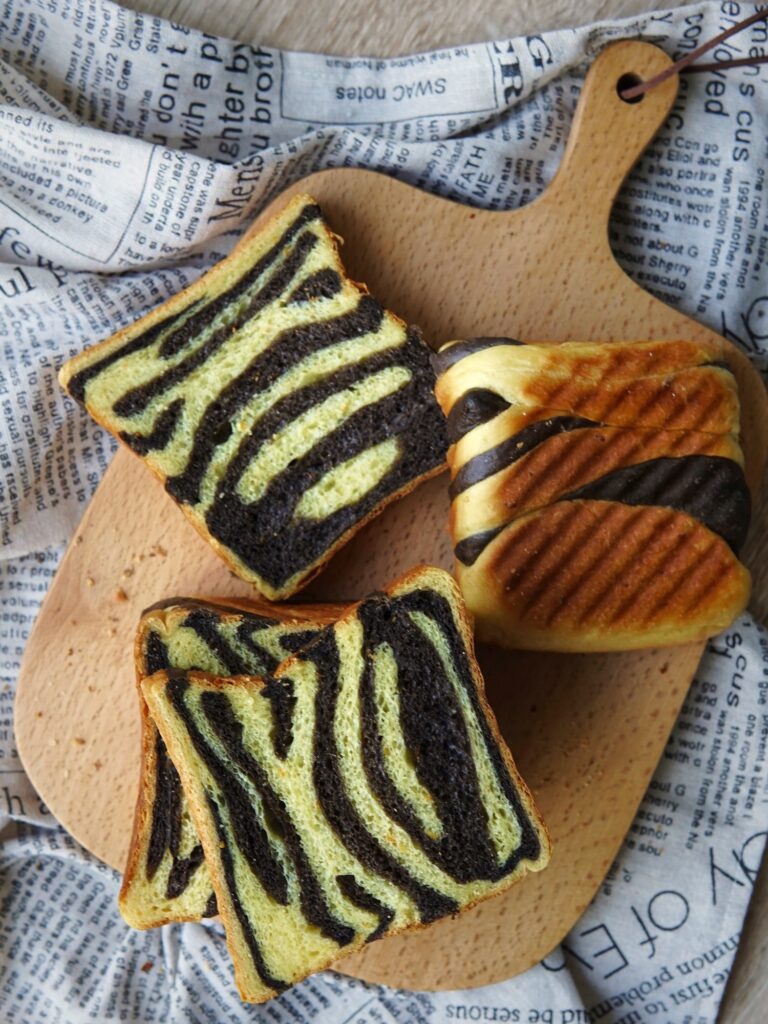
As the Lunar New Year looms closer, here’s a Tiger Striped Orange & Chocolate Soft Bread if you are up for some fun baking to usher in the Year of the Tiger!
This recipe was derived from the Cranberry Orange Soft Bread recipe with some minor changes made:
- Omitted cranberries and orange peel
- Added dark cocoa powder to a small portion of the dough for the stripes
If you would like detailed tips on the dough making, hop over to the Orange Soft Bread recipe here. In this post, I will touch upon how to create the tiger stripes print in further detail.
Making the Chocolate Dough
I used dark cocoa powder to achieve this dark brown shade, but you can also also use charcoal powder as a substitute. Create chocolate paste by mixing 1 tsp of cocoa powder + 1 tsp milk in a separate small bowl and set aside.
Once your orange dough is ready, you would remove dough and transfer to pastry mat. Portion out 180g of dough, and place back into mixing bowl. Next, add the chocolate paste into the 180g of dough and knead until well incorporated.
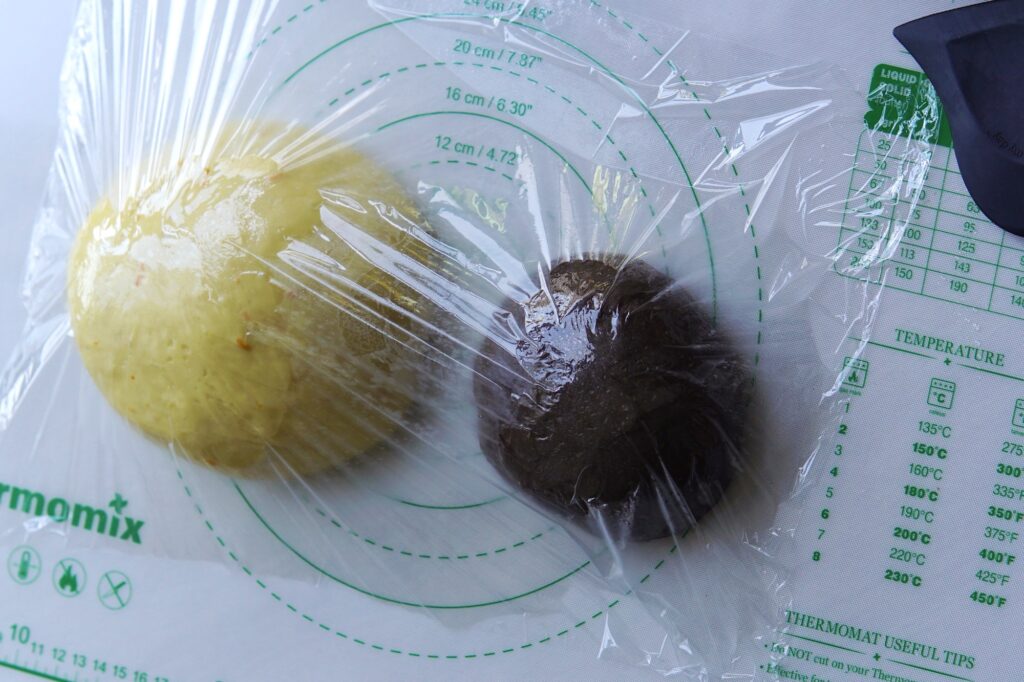
As for the orange dough, the colour is au natural from the orange zest and juice. This means your dough will not be bright orange. You may add 1-2 drops of orange food colouring if you have any handy.
Freehand Dividing & Pre-shaping of Dough
The best thing about this recipe is not having to weigh out each portion equally! You have the freedom to shape it to your own preference.
Divide orange dough into an uneven mix of 10-12 portions. I suggest 2 of them being slightly bigger for the top and bottom layer. Repeat the same with the chocolate dough, with 10 portions which are a little more even. You don’t have to weigh, just eyeball.
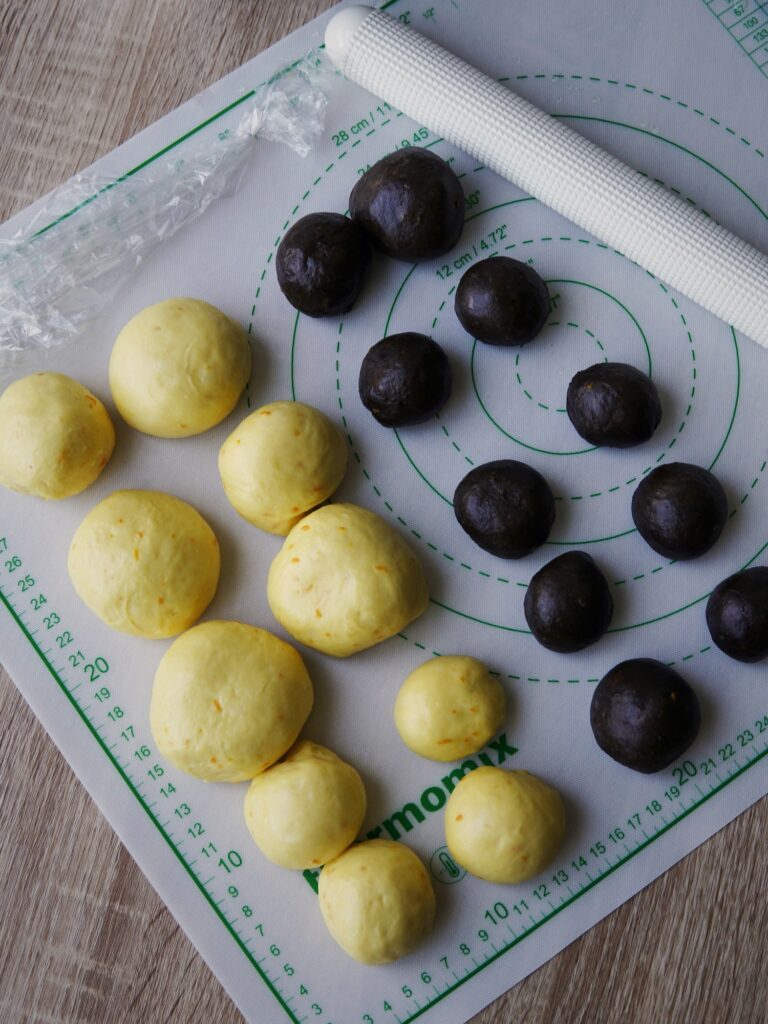
Don’t skip the pre-shaping of the dough balls – you may refer to this quick guide on how to pre-shape here on my Instagram. Leave the dough balls to rest for 15-20 minutes on the bench, covered with a damp cloth or cling wrap. This short resting period will help relax the dough so the final shaping is easier.
How to Create Tiger Stripes
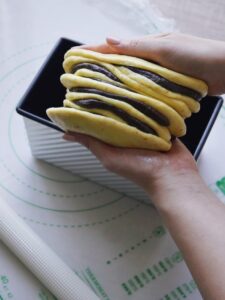
To shape, we would layer the dough alternately with the orange and chocolate dough. Starting firstly with a larger orange dough as the first layer. Next, roll out a chocolate dough, place it towards the side atop the orange dough as shown in Image 1.
For zig zag layers, repeat with another orange dough, and stack another chocolate dough on the other side as shown in Image 2 below:
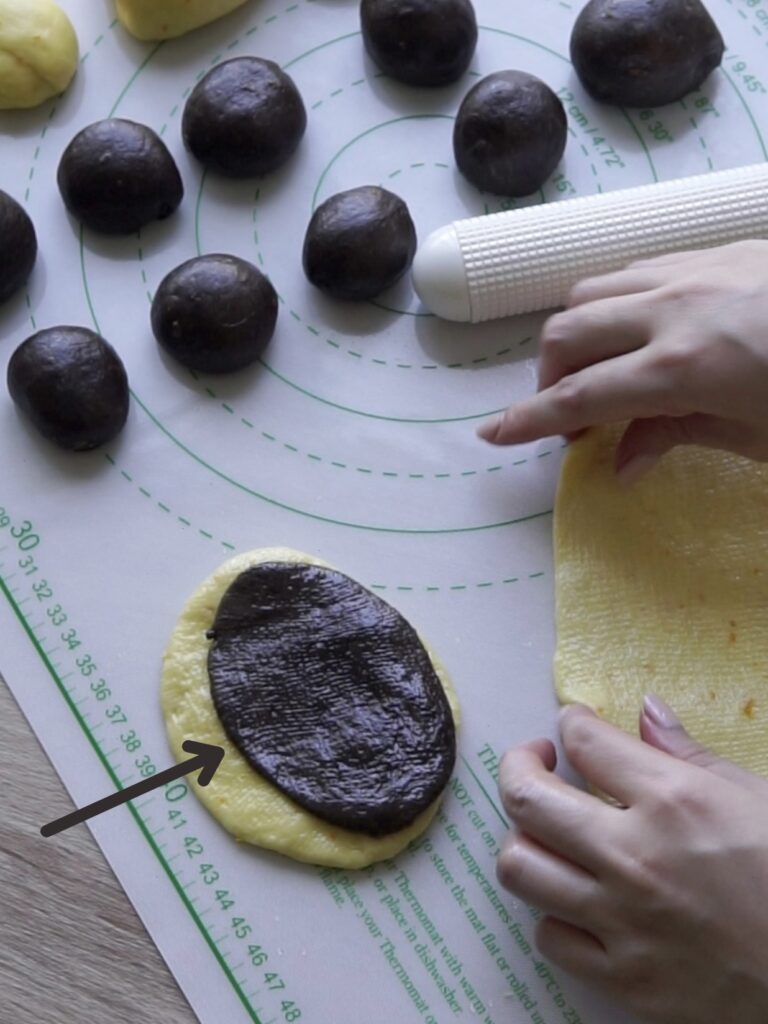
Image 1 
Image 2
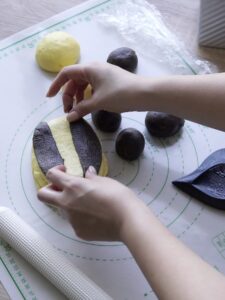
For some layers, I would also suggest rolling out a chocolate dough, slicing it into half through the middle, and placing one on each side. There’s no right or wrong for the dough layering; in fact the more random the better.


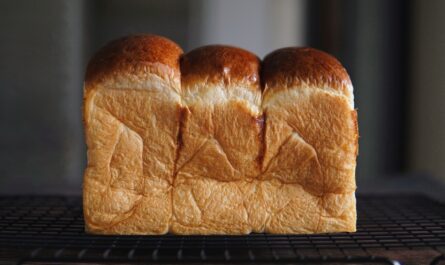
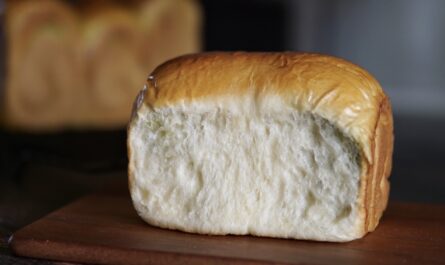
Baking in a Pullman Loaf Tin
Place the dough evenly into a Pullman loaf tin and let rise to 80-85% to the rim. Cover with your greased Pullman lid – key here is to grease. You don’t want bread stuck to the lid.
For aesthetic purposes, I suggest baking with the lid on for a nicely squared loaf. Of course you could also bake the loaf without the lid if you do not have a Pullman tin – your loaf will be domed loaf which may distort the stripe patterns a little. Be rest assured taste and texture wouldn’t differ too much. If you are baking without lid, bake for 30-35 minutes at 180°C. If baking with lid, please follow recipe below.
Quick Video Guide
Check out my quick 1 minute video for some visual guidance
Last year I shared a Cow Milk Bread recipe, which many tried with their kids and enjoyed. If you are looking for other fun bread ideas, you may also want to check out my Cinnamon Apple Bun recipe too!
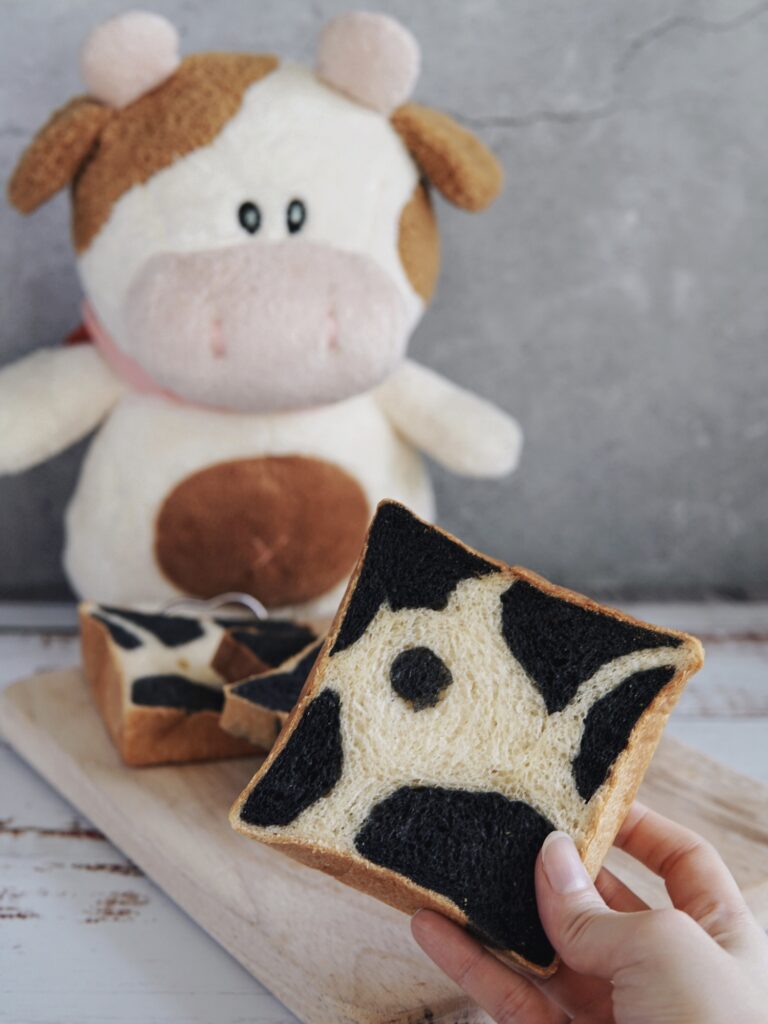

This year, I hope you will try out this Tiger Striped Bread recipe – it is not only soft, fluffy and delicious; the cuter tiger stripes print will excite both kids and adults alike!
I can’t wait to see how you go, so if you are sharing your masterpieces on Instagram, do tag me @thebakeanista! If you enjoy this recipe, please do leave a comment below along with a 5-star rating with your experience.
Happy baking and have a ROARsome New Year! 🐯

Tiger Striped Orange Chocolate Dough
Ingredients
Tangzhong
- 20 g high protein bread flour
- 100 g orange juice
Chocolate Paste
- 1 tsp dark cocoa powder
- 1 tsp milk
Main Dough
- 25 g castor sugar
- zest of 2 oranges
- 50 g orange juice
- 80 g fresh milk chilled
- 1 egg yolk
- ½ tsp salt
- 15 g milk powder
- 280 g high protein bread flour
- 1 tsp instant dried yeast
- 25 g unsalted butter softened
Instructions
- Please note that I have included two methods below for tangzhong making and dough kneading using either the Thermomix or conventional bread machine so do take note of the sub-headings. If you're new to breadmaking, I also suggest you read through the notes and FAQ below the recipe.
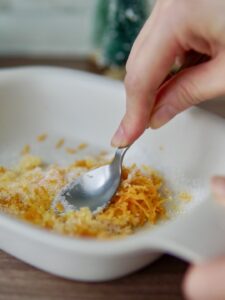
- Place the zest of two oranges and 28g castor sugar in a bowl. Rub together using back of spoon to release the essential oil and citrusy aroma, then set aside.
- Juice 2-3 medium sized oranges to yield a total of 150g of fresh orange juice.
- Prepare Chocolate Paste by mixing cocoa powder and milk in a separate small bowl. Set aside.
(A) THERMOMIX – Tangzhong & Dough Kneading
- To make the tangzhong, place 20g high protein flour and 100g orange juice in mixing bowl, cook for 3min/80°C/spd 3 and let stand for 15 minutes until temperature lowers down to 40°C.
- Add remaining 50g orange juice and milk, egg yolk, orange zest + sugar mixture, salt, milk powder, 270g high protein flour and yeast then knead 4min.
- Add butter, knead 1min.
- Remove dough and transfer to pastry mat. Portion out 180g of dough and place back into mixing bowl. Shape the remaining orange dough into a round ball and let proof in a warm place covered loosely with cling wrap or damp towel until doubled in size.
- Add chocolate paste into mixing bowl and knead 30 seconds until well incorporated. Transfer chocolate dough to pastry mat, and shape into round ball and let proof for an hour. Let proof covered loosely with cling wrap/damp towel until doubled in size (approx. 45-60 minutes).

(B) CONVENTIONAL – Tangzhong
- Prepare tangzhong by mixing flour in orange juice and whisk together in a pot, ensuring the mixture is well combined with no lumps. Cook over medium-low heat, stirring consistently to prevent burning and sticking while you cook.
- The mixture will gradually become thicker. Once you notice that some “lines” appear in the mixture for when you stir with the spoon, it’s done. Your tangzhong is ready.

- Transfer into a clean bowl. Cover with a cling wrap sticking onto the surface of tangzhong to prevent it from drying up. Let cool.
(B) CONVENTIONAL – Dough Kneading
- Add all ingredients (except butter) into breadmaker; first the wet ingredients, then followed by the dry ingredients.
- Select "dough" mode and let knead until all ingredients come together, usually I let it knead for approximately 8-9 minutes.
- Then add in the butter, continue kneading until the dough is smooth and elastic. The time of kneading in the breadmaker should take approximately 20-25 minutes. For those using standmixer, upon 15-20 minutes of knead time, check to see if dough has achieved windowpane stage.
- Remove dough and transfer to pastry mat. Portion out 180g of dough and place back into mixing bowl. Add chocolate paste into mixing bowl and knead 3-4 minutes until well incorporated.
- Transfer chocolate dough to pastry mat and shape both doughs into smooth, round balls. Let proof in a warm place covered loosely with cling wrap or damp towel until doubled in size (approx. 45-60 minutes).
Dough Shaping
- Grease hands lightly with neutral flavoured oil or butter, then punch down both orange and chocolate dough to deflate. Divide orange dough into 10-12 uneven portions with 2 portions being slightly bigger – these will be the top and bottom layers. Divide charcoal dough into 10-11 portions. To pre-shape, roll each portion into a round, even ball then let sit on bench to rest for 15 minutes, covered with cling wrap or damp towel.

- To shape the stripes, we would layer the dough alternately with the orange and chocolate dough. Start with a larger orange dough as the first layer – flatten with rolling pin and place aside. Next, roll out a chocolate dough, placing it towards the side, atop of the orange dough.

- Top with another orange dough, and repeat with stacking another chocolate dough on the other end to create a zig zag layer.
- For some layers, I suggest rolling out a chocolate dough, slicing it into half through the middle, placing one on each side, atop an orange dough.
- Repeat for remaining dough, ending with the other larger orange dough then arrange evenly in tin. Cover and let rise for 40 minutes or until 80% to the rim. During last 15-20 minutes, preheat oven to 190°C.
- For square-shaped loaf, put the greased lid on and bake on the second rack from bottom at 190°C for 30 minutes, then lower down the temperature to 180°C and bake for a further 5 minutes.
- Remove bread from tin and allow to cool completely on a cooling rack for at least an hour before slicing and serving.
Notes
Few Things to Note
When it comes to bread making, there are many factors that will influence your dough and the end product. Recipes should be used as a guide, as you familiarize yourself with the process and dough.
For instance, your dough may require extra kneading time depending on the flour and its protein content. The method used to knead also needs to be taken into account as some machines work the dough quicker, whilst others may require a bit more kneading time.
Temperature and humidity plays a big part in how your dough rises. The amount of time required to proof your dough also varies depending on where you’re based at. For my second proofing, I usually heat up a cup of water in the microwave for 1 minute, then proceed to leave my dough inside the microwave to rise for 25-30 minutes.
It’s also very important to try to get to know your oven, as every oven is different. My oven heats up quickly so when a recipe calls for 180°C, I sometimes drop it down to 160-170°C. Keep an eye out as the bread is baking. Adjust either the baking temperature or duration according to how your oven behaves.
FAQ
What is tangzhong and how does this help yield bread that stays soft and tender?
This is a popular Asian method that involves cooking a ratio of 1:5 flour with liquid (either milk and/or water) into a gelatinous looking paste. This paste is then left to cool before adding to the rest of your ingredients. The pre-gelatinized starch when cooked at high temperature is able to absorb a higher amount of liquid. When this is added to the dough, you are essentially adding more hydration to the dough. To put it simply, the dough is able to retain more water during kneading, proofing and baking. This in turn result in soft, cloud-like final baked product.
Can I use whole egg instead of just the egg yolk?
By using just egg yolks, we are adding fat, richness and flavour to the bread. The fats from the yolk works to tenderise the crumb and lighten the texture which gives our loaf a rich and soft crumb. You can use the whole egg if you like, but you will have to adjust the recipe accordingly or you’d be adding too much hydration with the addition of the egg whites as well.
Can I omit milk powder?
You may opt to omit the milk powder but I wouldn’t recommend it. Milk powder adds fats, protein and flavour to the dough, that not only makes the dough richer and creamier in taste, but also helps dough rise higher. The addition of milk powder will also help yield a more tender crumb texture.
I wouldn’t suggest substituting milk powder with liquid milk as it is adding extra hydration to the dough, which may alter the texture of the finished product. In other words, adding milk powder gives you the same benefits of milk without the extra liquid, with a more concentrated % of milk sugar and protein that will benefit the dough.
Help! My dough is too sticky!
For bread maker users, check the dough 10 minutes into the kneading cycle. It should be smooth and the mixing bowl should be clean by now. If your dough is too sticky to manage, you may add 1 tbsp of flour at a time.
For Thermomix users, if you experience a stickier dough (particularly for TM6 users) you may want to increase to 290g of high protein bread flour in your main dough to be able to better manage the dough. If your dough is still too soft to handle, add 1 tbsp of flour at a time and knead for 15-20 seconds until incorporated.
Lightly oil your hands (and the pastry mat depending on how sticky your dough is) using neutral flavoured oil to shape dough into a ball. Apply the chafing technique by cupping your hands gently around the dough, apply a light, downwards pressure to the sides whilst simultaneously rotating the dough in a circular clockwise motion. Continue doing so until a smooth, even, and round ball is formed.
How do I know if my bread is well proofed and ready to be baked?
You may perform the visual test to check. Lightly press the surface of the proofed dough with the tip of your finger for about 2 seconds and observe how fast the dough bounces back up.
- UNDER-PROOF: If it bounces back up too fast without any indentation, it isn’t ready yet, so give it more time.
- READY TO BAKE: It is supposed to bounce back up slowly, about halfway up and leave a slight indent.
- OVER-PROOFED: If the indent remains without bouncing back up, yes it is over-proofed, but don’t worry! You can still save it.
How to save an overproofed bread dough?
If the dough is overproofed, the gluten is being over-stretched and it will be unable to hold up the internal structure of the bread. The wall will highly likely fall after baking and the loaf would then collapse. If it isn’t severely over-risen, you have the option to quickly pop it into the oven to bake it right away. Otherwise what you can do to save it is by deflating your overproofed dough and reshape, then repeat the second proofing again.
Which oven rack and what oven setting should I use?
I suggest the second rack from bottom. I bake using top and bottom heat, with fan.
When to remove bread from tin?
Upon removing from oven, immediately remove it from the bread tin and let cool on a wire rack. This step is crucial in ensuring there is proper air circulation and that condensation does not happen causing your bread to get wet/soggy at the bottom.
When do I slice the bread?
Of course, I understand how hard it is to resist freshly baked bread. But! Slicing into your loaf of bread before it has cooled down completely may sometimes result in wet gummy crumb texture. Always let your bread rest for at the very minimum 30-60 mins, best for 1.5-2 hours. Just like how you would rest your meat after cooking, the same theory applies for your bread. By allowing your bread to cool completely, it helps stabilise the crumb structure.
Have you tried this recipe?
IF YOU MADE THIS RECIPE, I’D LOVE TO SEE HOW IT WENT!
TAG ME ON INSTAGRAM @THEBAKEANISTA SO I CAN HAVE A LOOK AND RE-POST ON MY IG STORIES!
IF YOU ENJOYED THIS RECIPE, YOU MAY WANT TO CHECK OUT MY RECIPE INDEX FOR OTHER DELICIOUS RECIPES.
So yums and so easy to make. It’s been 4 days and my bread is still so soft (kept at room temp, in an air tight container).
I added zest from a third orange, just because my family loves the citrusy taste and there were extra oranges at home 🙂 This recipe is definitely a keeper!
This is music to my ears!! Thank you Sya for such a lovely feedback. ❤️