Hot cross buns! Hot cross buns! One a penny, two a penny, hot cross buns!
I am sure many of us remember this nursery rhyme – possibly one of the first few I learnt in music class as a kid. Traditionally enjoyed on Good Friday, hot cross buns are made using a sweet dough base filled with spices and dried fruits, then marked with a cross on top prior to baking.
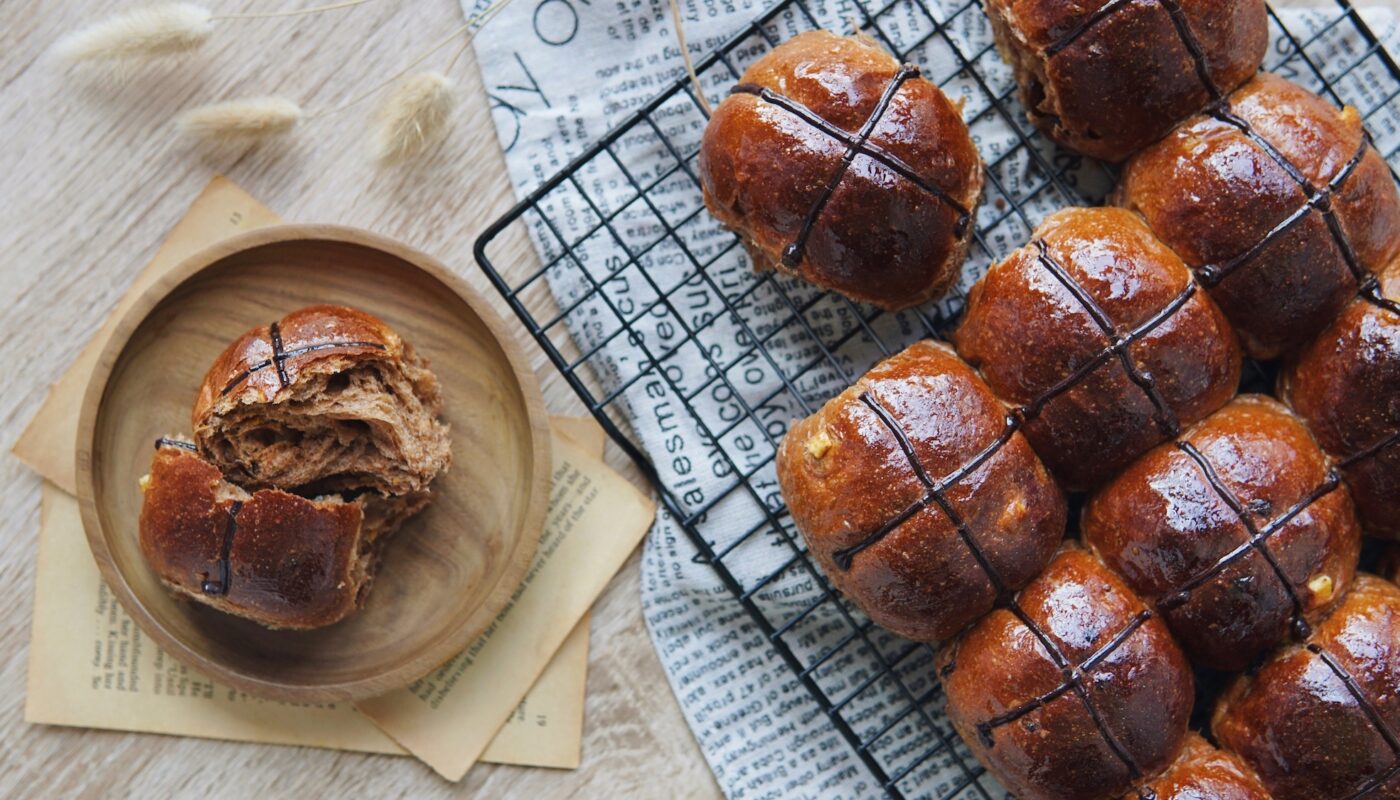
With Easter around the corner, this is my rendition on Hot Cross Buns; but with a fun chocolate orange twist!
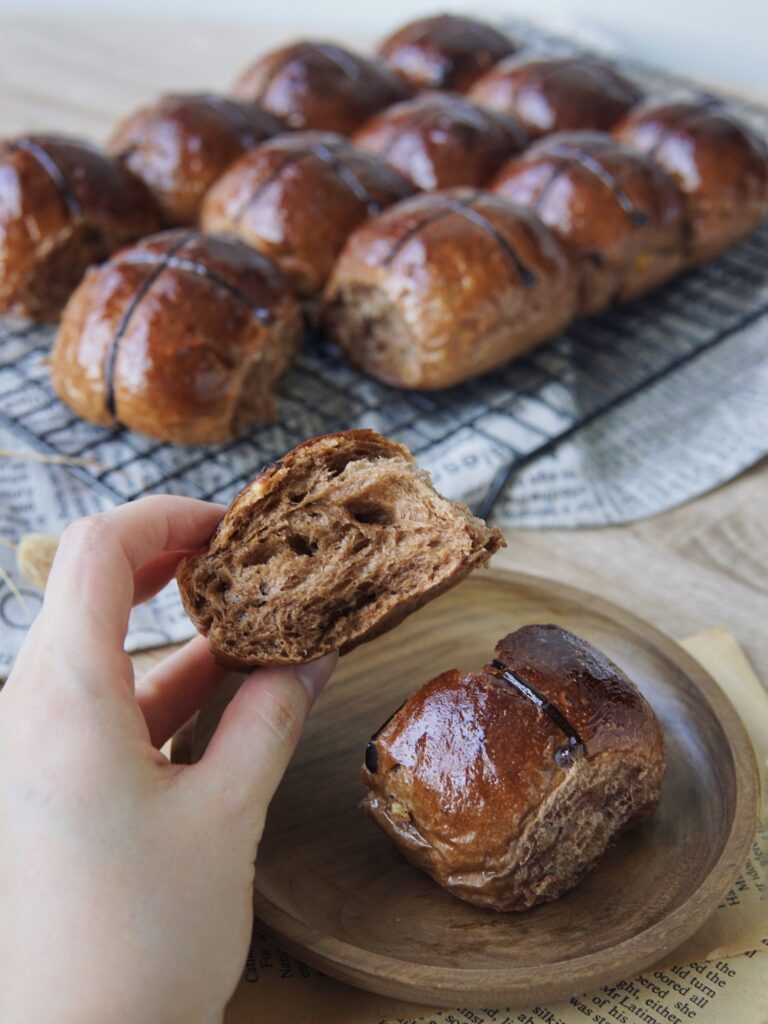
Infused with orange juice, the deliciously spiced dough is packed with cocoa powder, raisins, sultanas, orange zest and orange peel for a citrusy kick, AND a hint of vanilla extract for extra flavour.

How to keep Hot Cross Buns soft & fluffy?
I personally like my hot cross buns eaten plain on its own; no toasting, and without butter. So naturally, I’d appreciate it soft, even on day 2 and 3. Most hot cross buns that I’ve tried in the past are either too dense for my liking, or only fluffy when fresh out of the oven and sadly do not stay soft beyond day one.

So I incorporated the Tangzhong (water roux) method to make the softest and fluffiest hot cross buns! Tangzhong method is my favourite method to make bread, as evidently shown in my Recipe Index with various recipes incorporating this method.
These buns can stay soft for a couple of days. I suggest up to 3 days stored in an airtight container, at room temp. After which it is best to store them in the refrigerator for up to a 1 week or freeze them if you wish to store them for longer.
How to Shape Hot Cross Buns?
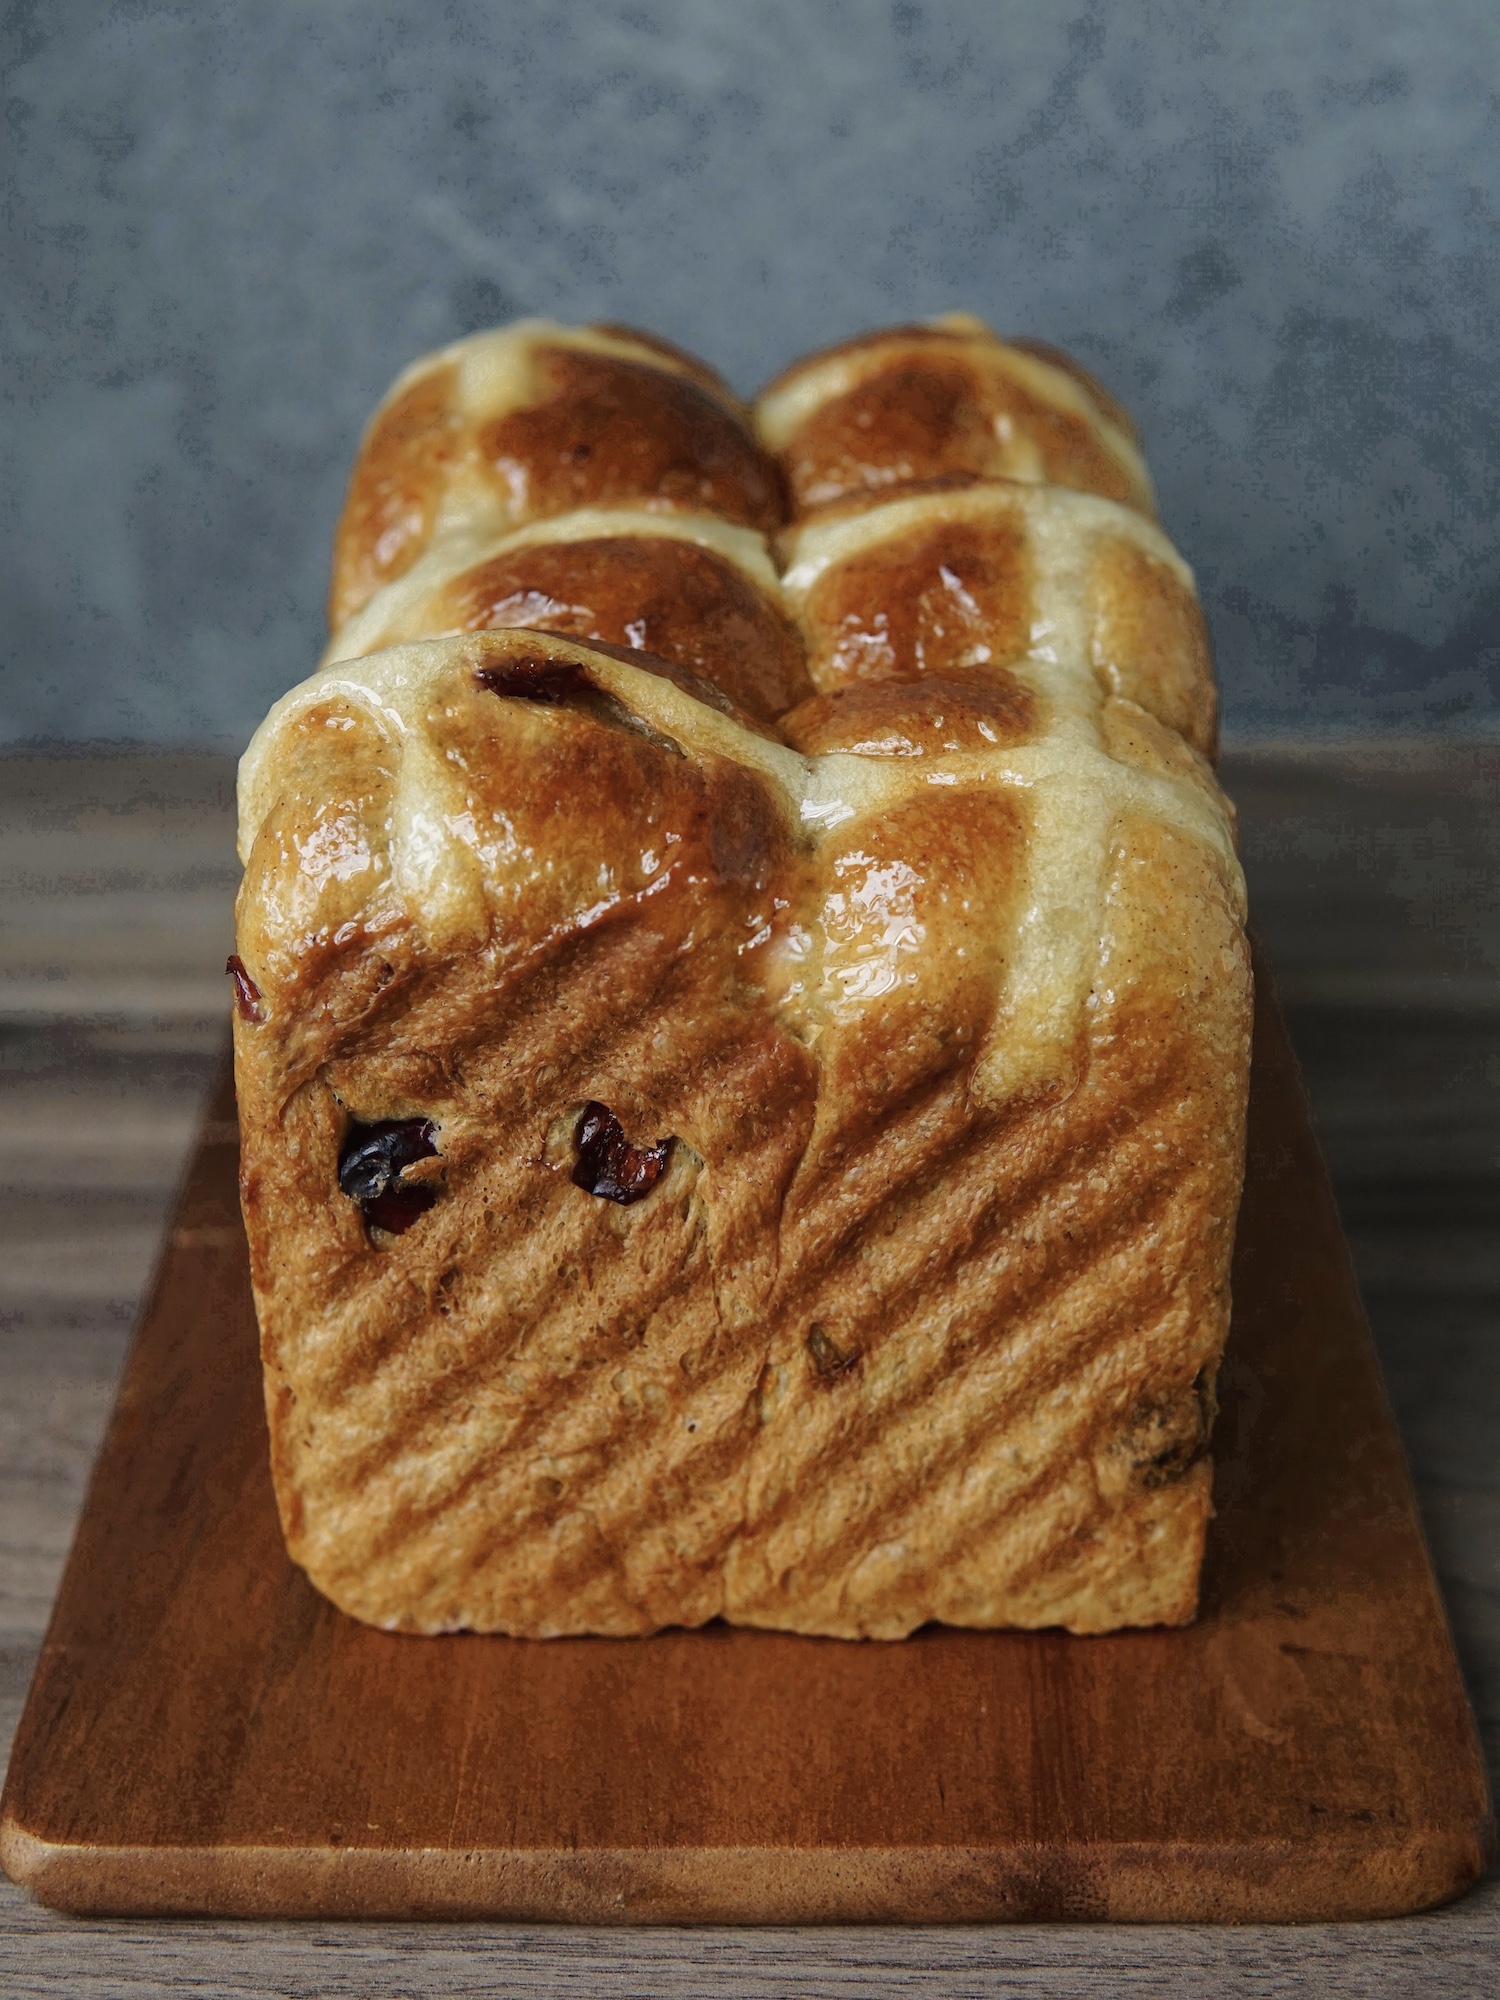
After the dough has completed its first round of proofing, known as the bulk fermentation, we would then deflate dough and divide into 12 equal pieces. Gather each individual dough and shape into round balls. Then place into a lined/greased 9×13 inch baking pan. Each dough weighs approximately 55-56g, which I find is the perfect size for one hot cross bun.
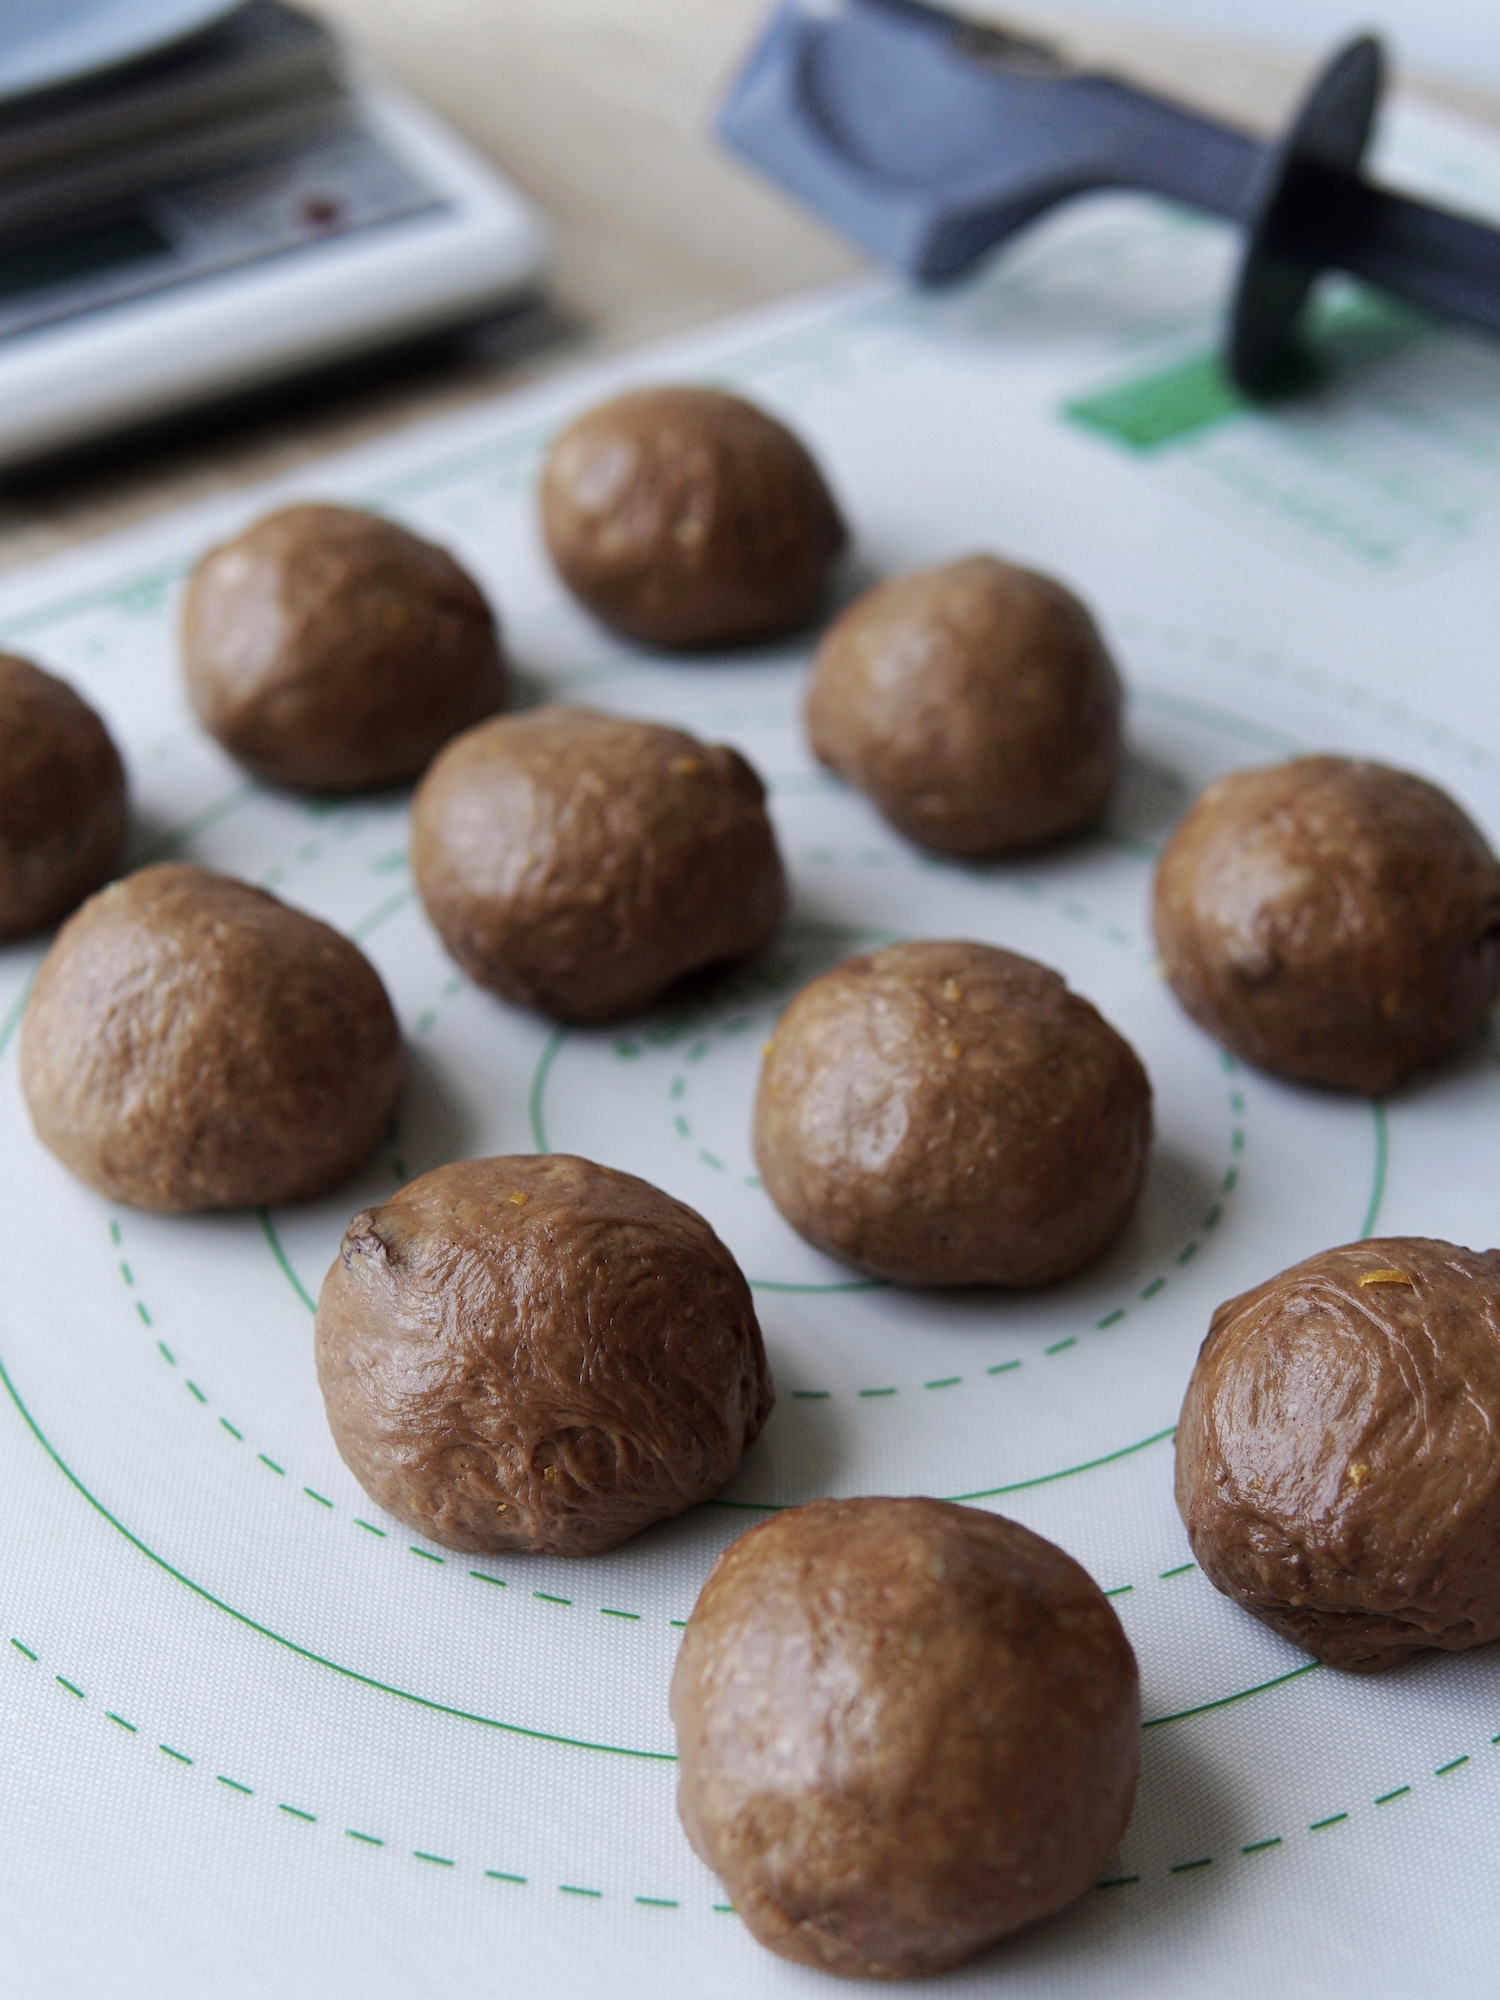
Essentially what I do to shape the dough is by using the chafing method to tuck the dough in. Take each piece of dough and fold the corners into the center, forming a rough round ball. Then using the corner of your palms at a 45 degree angle, press dough downwards whilst rotating dough to create smooth, taut round ball. Remember to grease your hands either with neutral flavored oil or butter for this action. You may watch this video below for a quick visual guide:
Crosses on Hot Cross Buns
To complete your hot cross buns, you will of course need the cross! It’s basically a mix of flour and water mixed into a paste, then piped on top of each bun before baking.
All you need is a piping bag (piping nozzle not required) or even a zip lock bag. I find it helpful to place the bag in a tall glass to hold the bag whilst you fill the bag with the flour paste.
Snip the corner off and you’re good to start piping. After baking, the “flour cross” does harden a little which is why I personally prefer a slimmer cross. You can most definitely cut a slightly bigger hole on your piping bag to achieve thicker crosses.
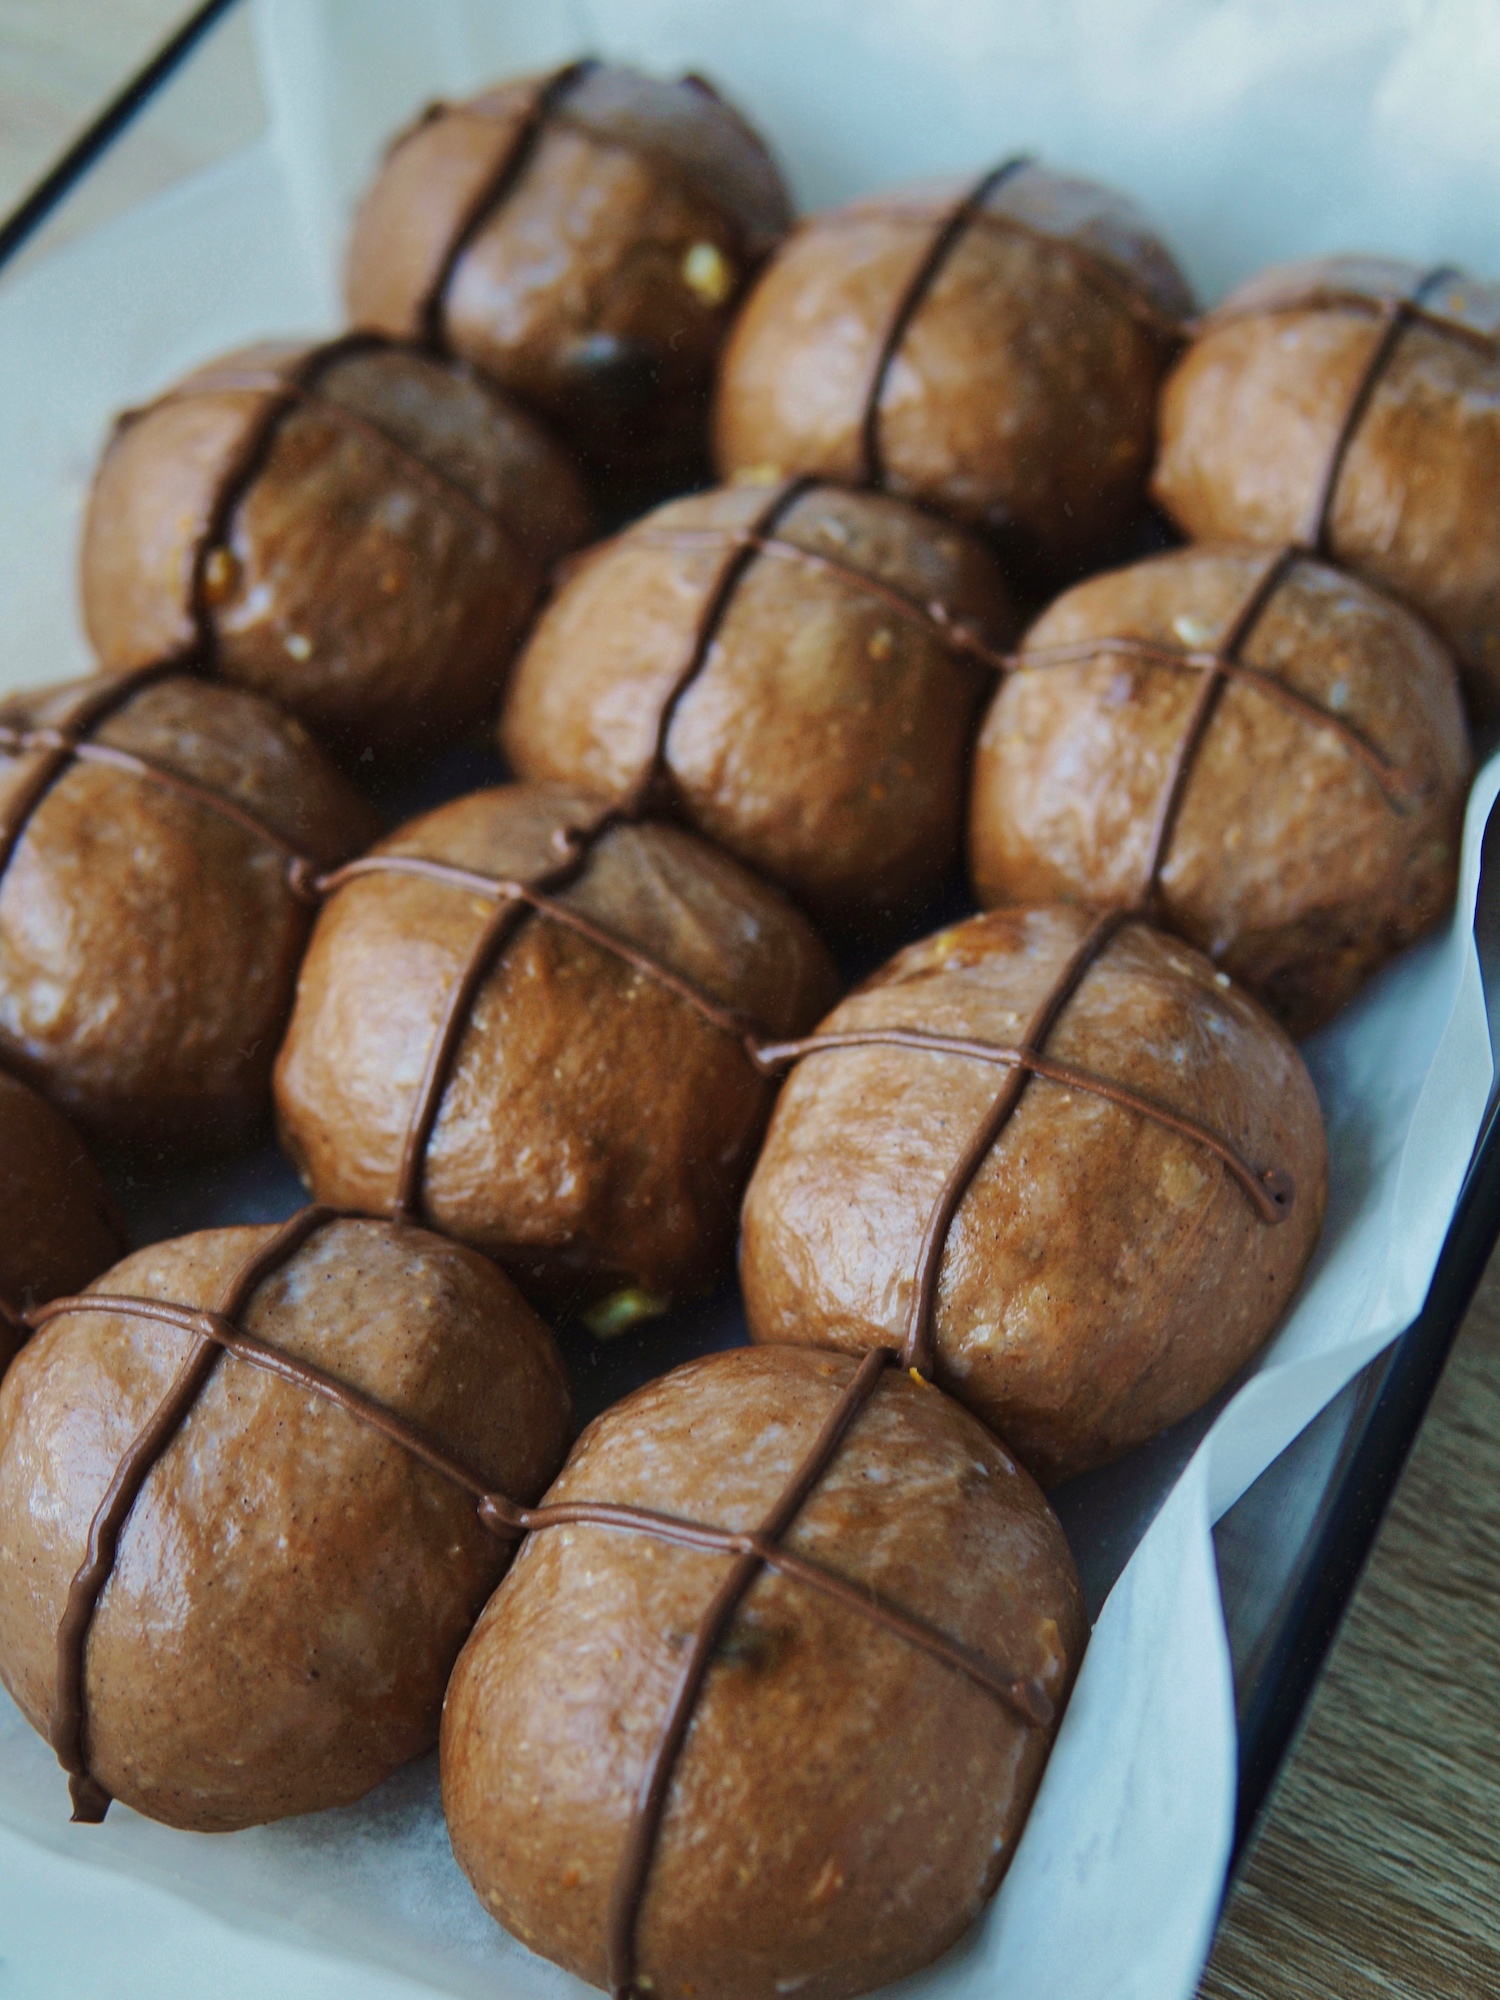
Traditionally, the crosses are white but I have opted for a chocolate cross. In a small bowl, mix 2 tbsp cocoa powder, 2 tbsp all purpose plain flour with 40ml water. Stir to combine. This is plenty of paste, way more than enough for 12 buns, but you don’t want to make too little paste as it may get tricky to pipe.
For a white cross, you would need just all purpose plain flour and water. Start with 40g all purpose plain flour, and 30-40ml of water. You want a thick paste that will pipe easily. Add additional water if needed.
Glazing the Hot Cross Buns
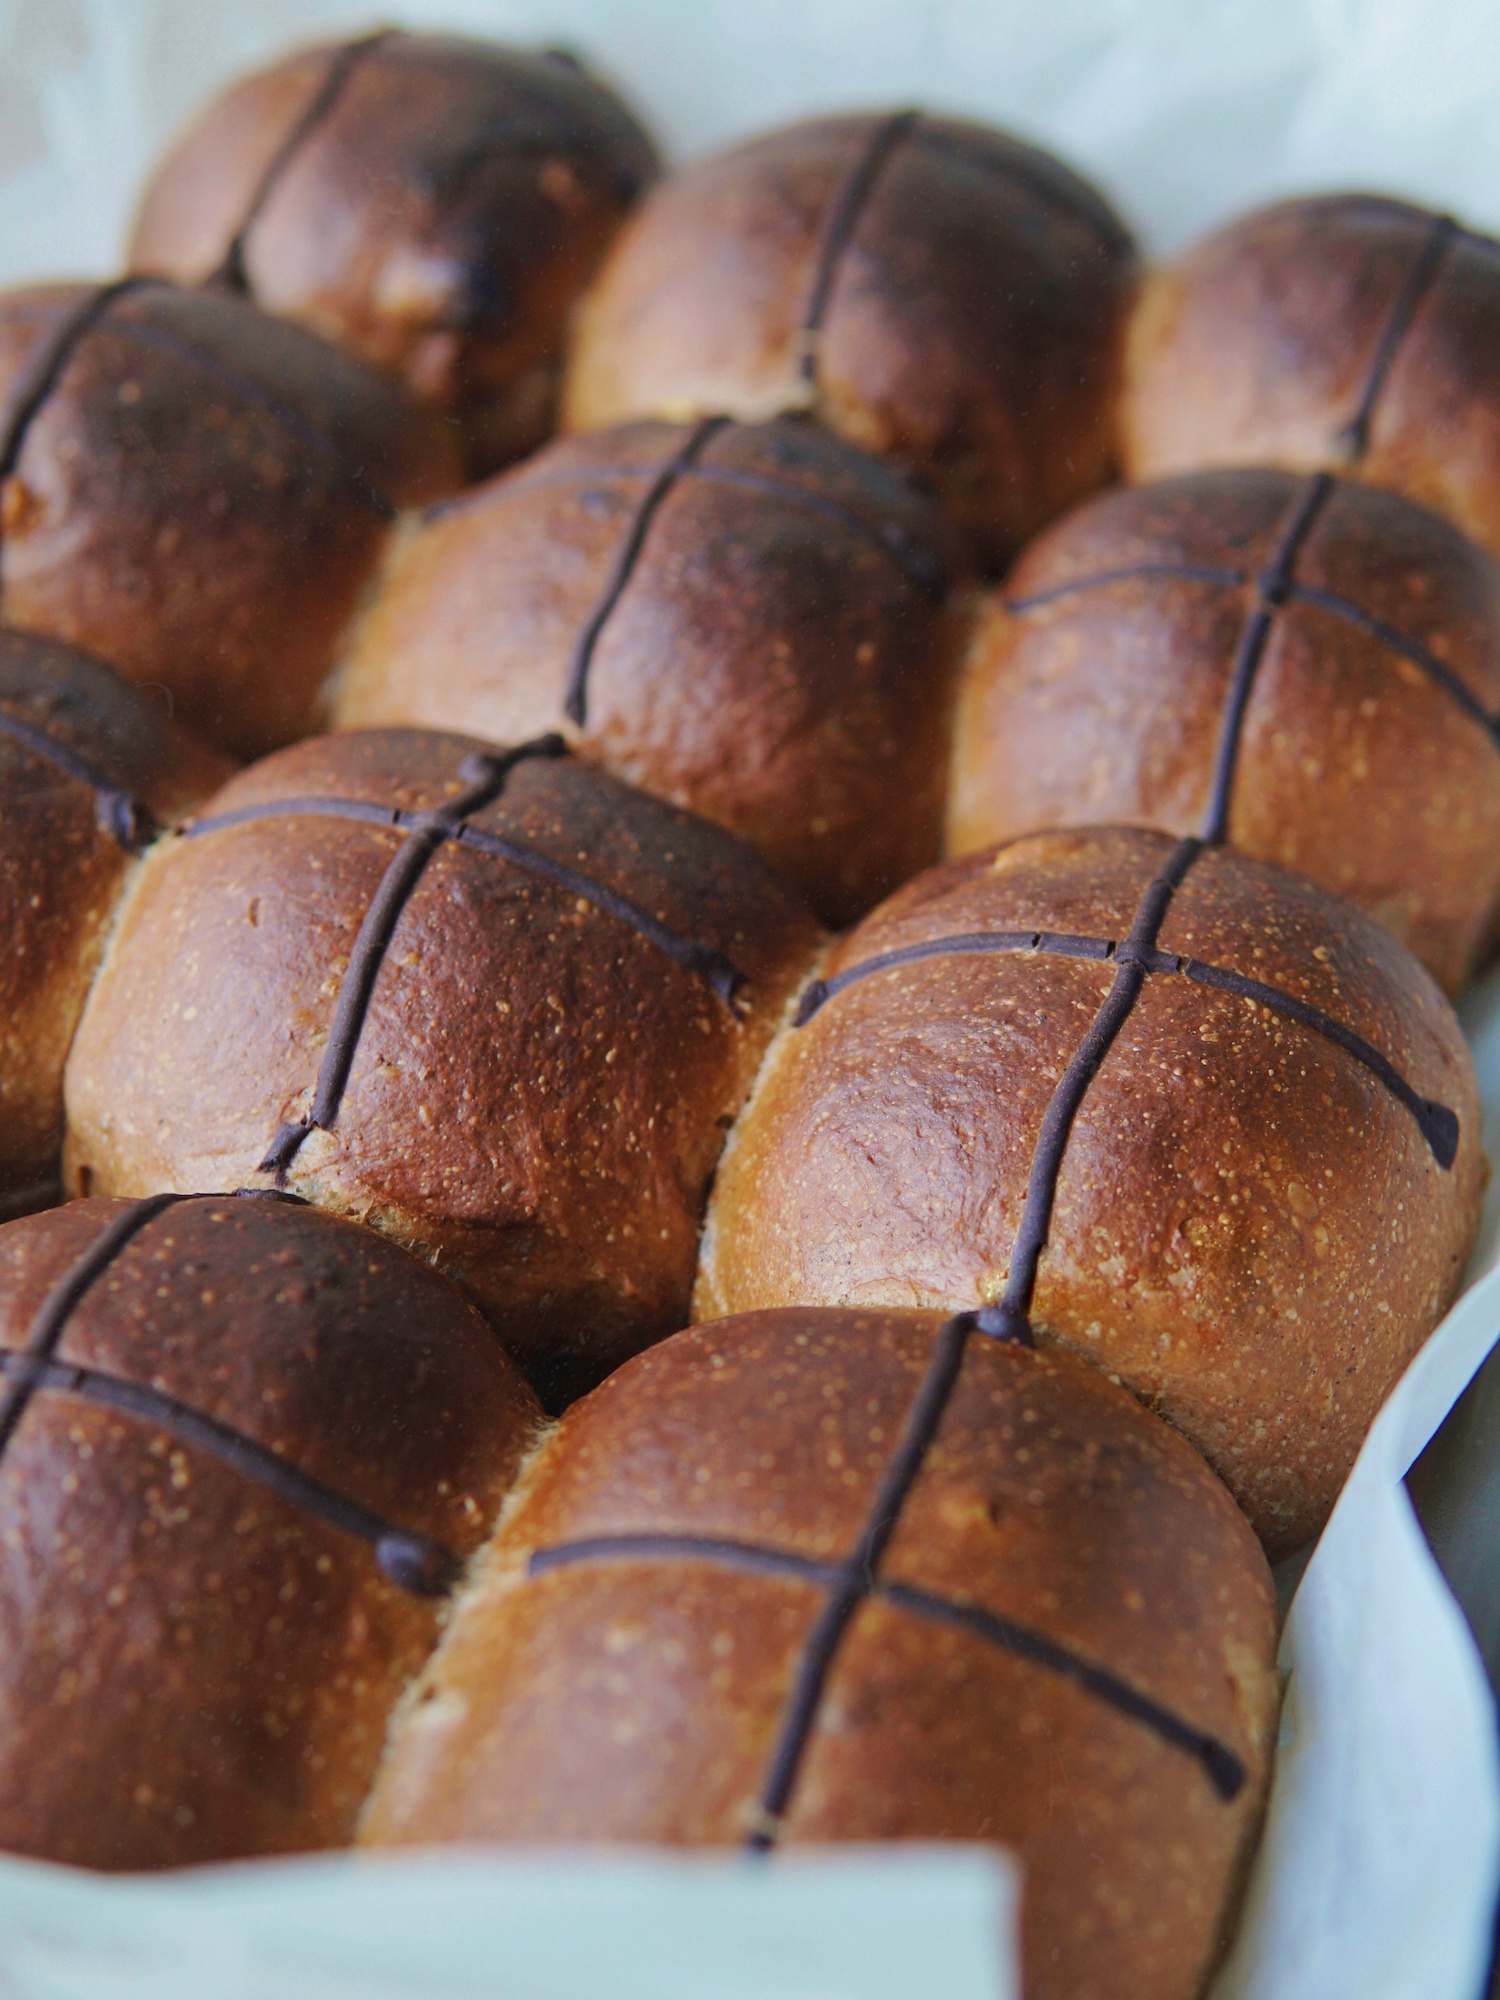
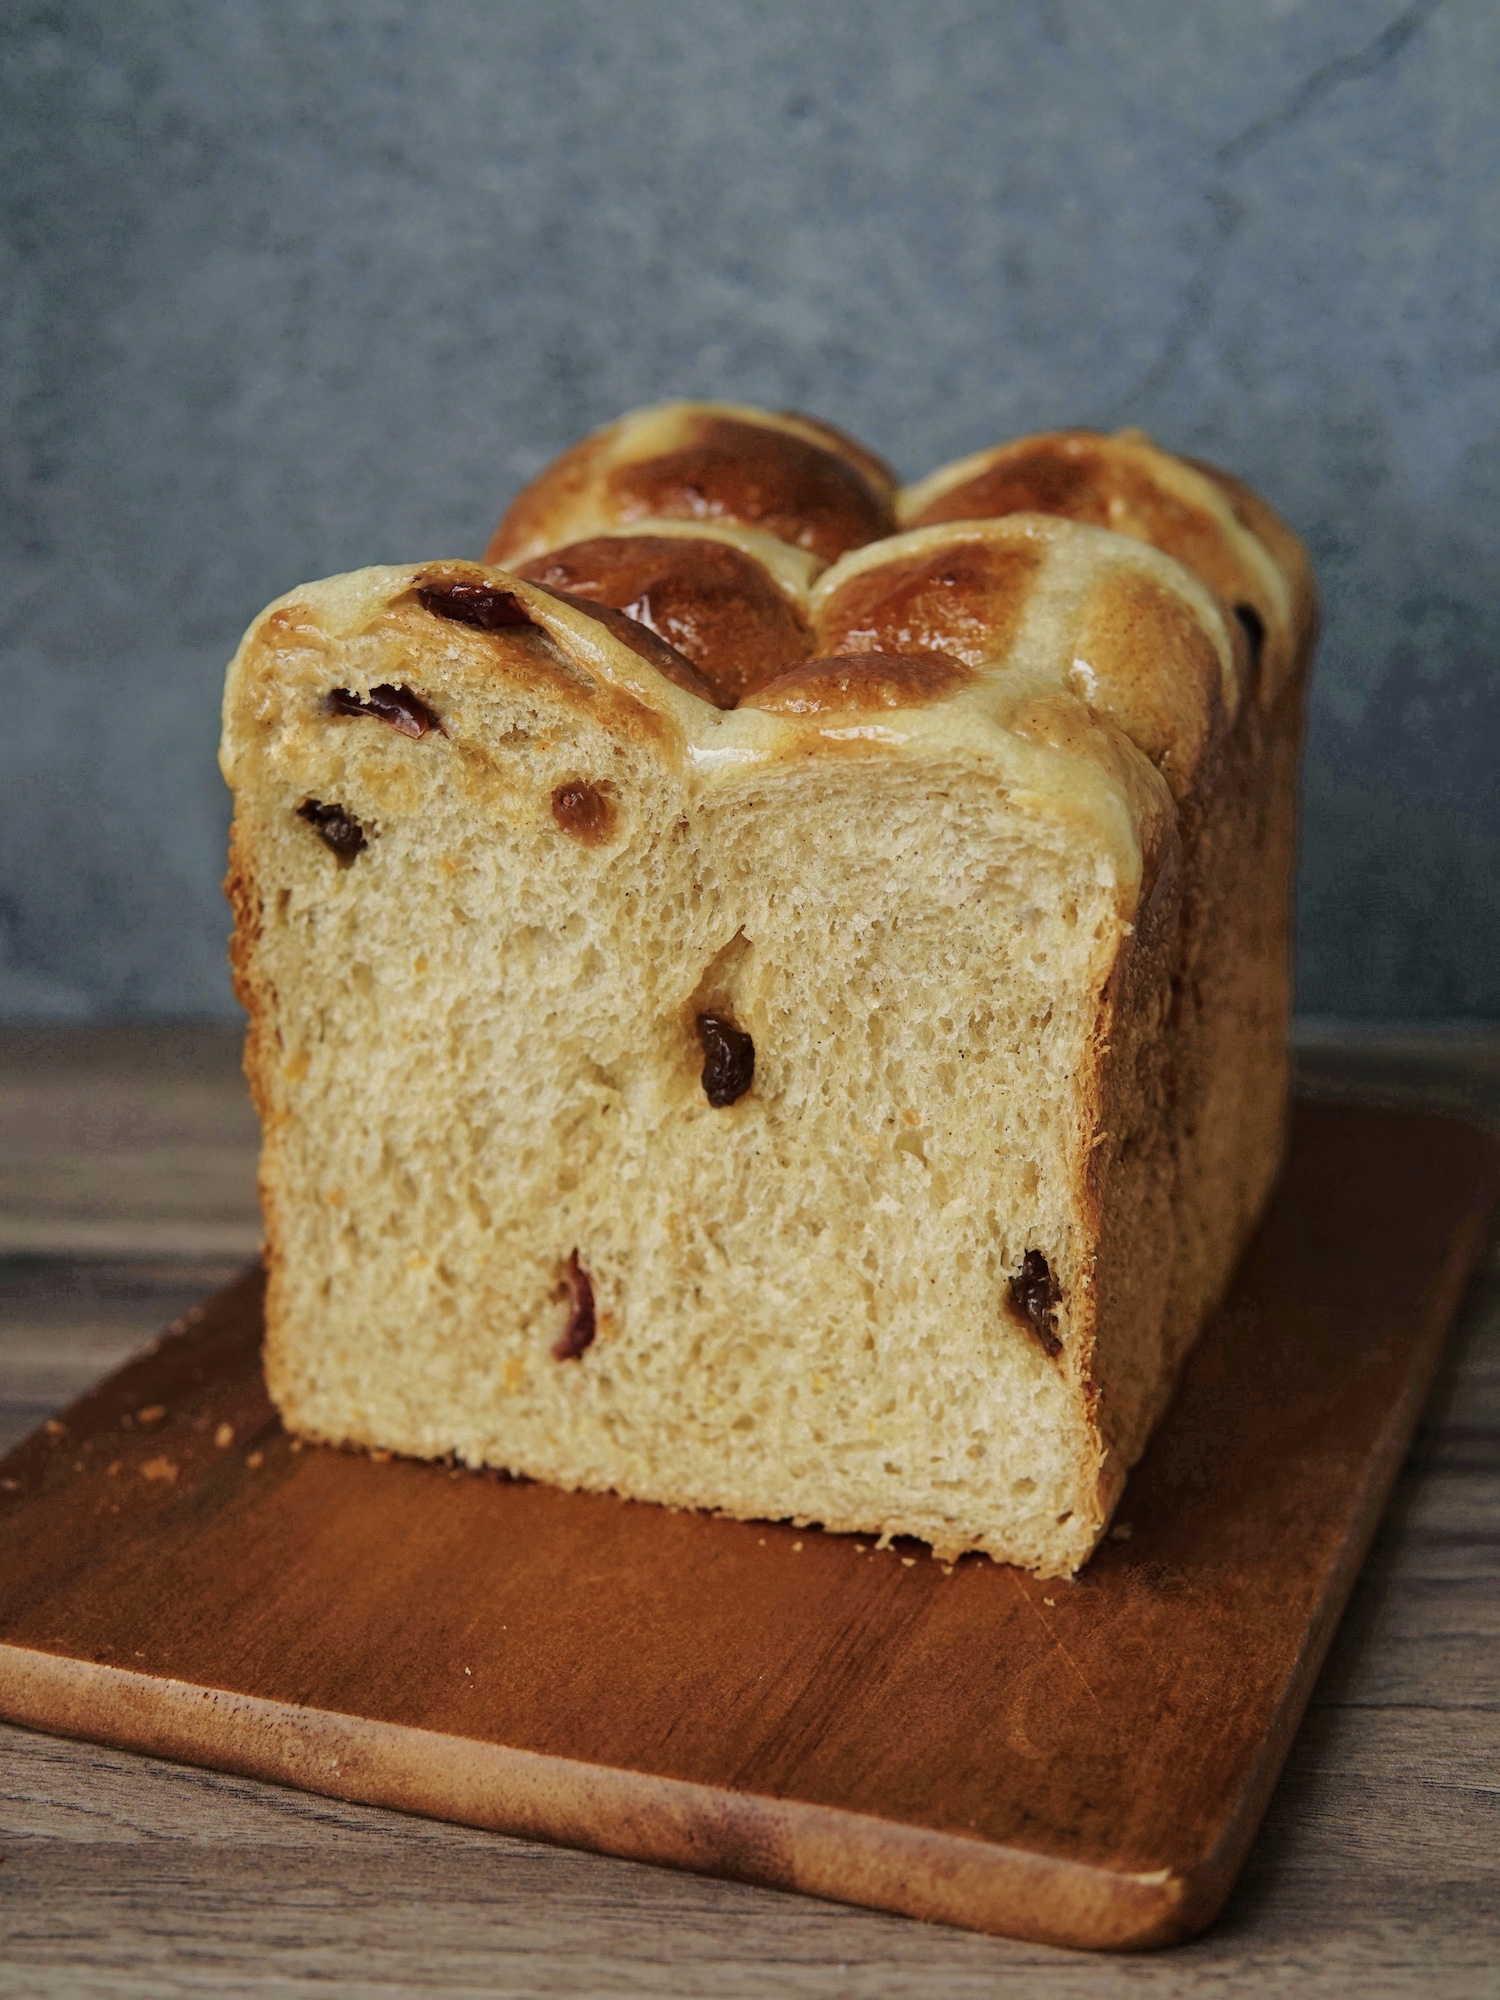
For the finishing touch, you’d want to glaze your buns with some sugar syrup, when the buns are fresh out of the oven. The buns will get a little sticky, but see how big of a difference the glaze makes in the pictures below.
On the left, are the buns in all its glory fresh out of the oven and on the right, the buns had a shiny glow up. All with a glaze of simple sugar syrup.
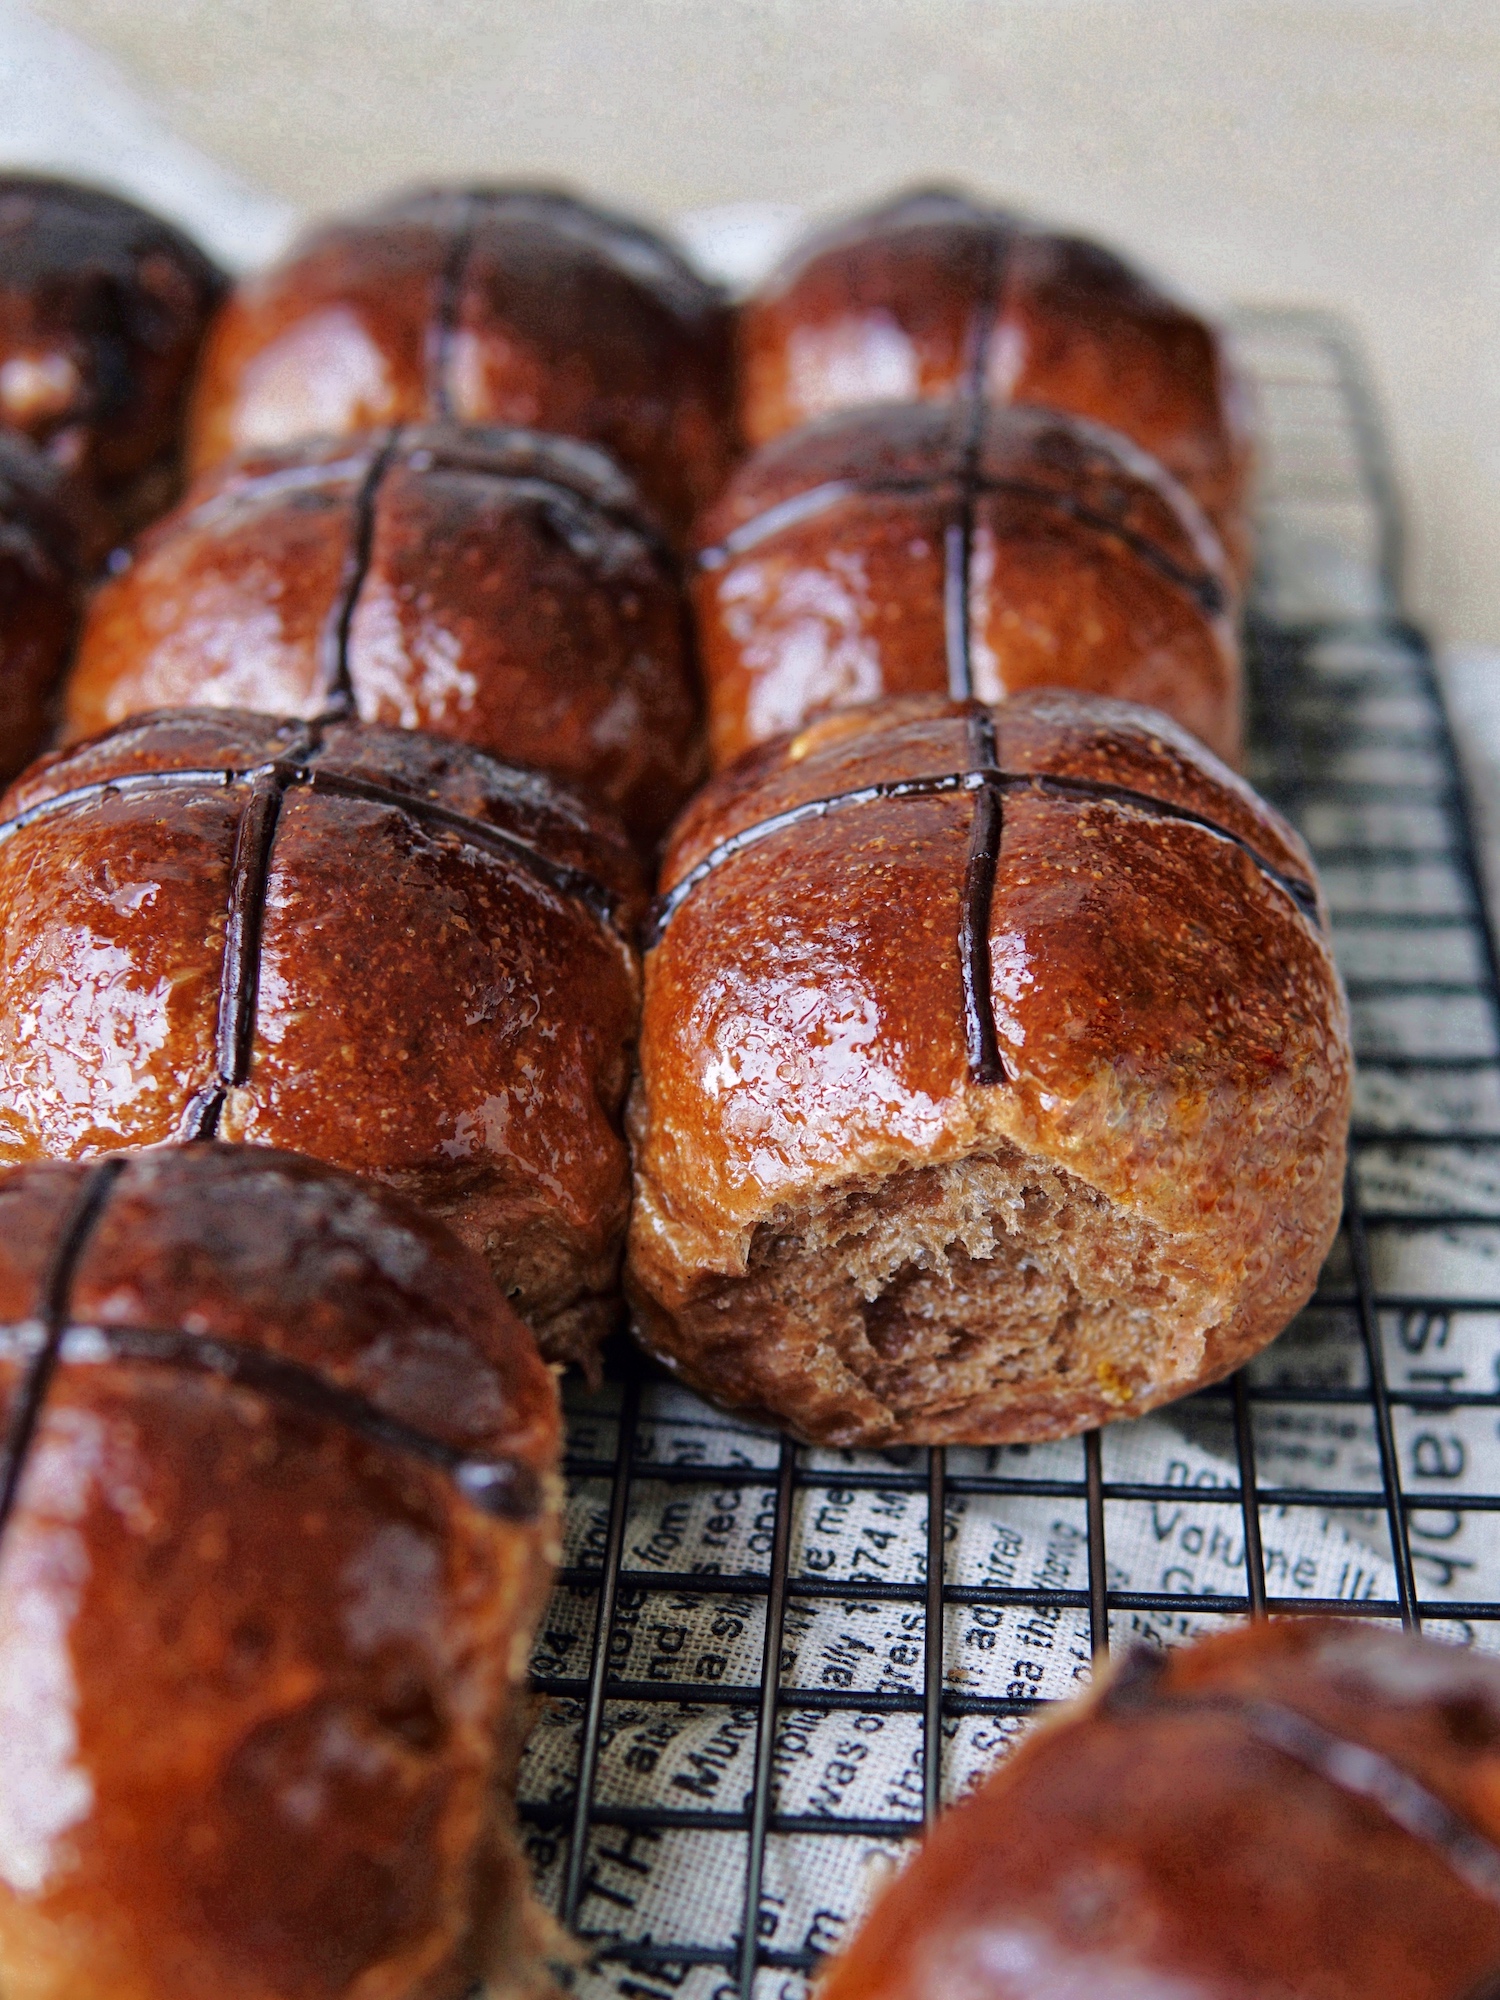
I am one to cut calories and sugar where I can, but in this case, I highly recommend not to skip the glaze. If you want to omit the sugar syrup, you may consider glazing with apricot jam.
For the glaze, I made a simple sugar syrup combining 3 tbsp of sugar with 3 tbsp of water. Bring it to the boil in a small saucepan or if using Thermomix, heat for 2 mins/100°C/Speed 3 without MC.
You can even use orange juice in place of water, for a sweeter orange syrup. It will go really well with these cinnamon-spiced chocolate hot cross buns!
Quick Video on the Making of Hot Cross Buns
Chocolate Orange Hot Cross Buns
Ingredients
Tangzhong
- 20 g high protein bread flour
- 50 g orange juice
- 50 g milk/water
Dough
- 50 g milk chilled
- 30 g whipping cream chilled
- 30 g castor sugar
- 1 large egg
- 1 tsp vanilla extract
- ¼ tsp salt
- 260 g high protein bread flour
- 20 g cocoa powder
- 1 tsp cinnamon powder
- ½ tsp nutmeg powder
- ¼ tsp all-spice powder
- 1 tsp instant dried yeast
- zest of 1 large orange
- 28 g unsalted butter room temperature
- 10 g milk optional for wash
Inclusions
- 50 g dried fruits (raisins, sultanas, currants) *see notes
- 20 g candied orange peel
Crosses
- 2 tbsp cocoa powder
- 2 tbsp all purpose plain flour
- 40 g water
Glaze
- 3 tbsp water or orange juice
- 3 tbsp sugar
Instructions
Please note that I have included two methods below for tangzhong making and dough kneading using either the Thermomix or conventional bread machine so do take note of the sub-headings.
TANGZHONG & DOUGH KNEADING (Thermomix Method)
- To make the tangzhong, place 20g high protein flour, 50g orange juice, and 50g water or milk in mixing bowl, cook for 3min/80°C/spd 3 and let stand for 15-20 minutes until temperature lowers down to 40°C.
- Add remaining ingredients in dough except butter, then knead 4 min.
- Add butter, knead 1 min.
- Add inclusions, knead 20 secs.
TANGZHONG & DOUGH KNEADING (Conventional Method)
- Prepare tangzhong by mixing 20g high protein flour, 50g orange juice, and 50g water or milk and whisk together in a pot, ensuring the mixture is well combined with no lumps. Cook over medium-low heat, stirring consistently to prevent burning and sticking while you cook.
- The mixture will gradually become thicker. Once you notice that some “lines” appear in the mixture for when you stir with the spoon, it’s done. Your tangzhong is ready.
- Transfer into a clean bowl. Cover with a cling wrap sticking onto the surface of tangzhong to prevent it from drying up. Let cool.
- Add all ingredients under Dough (except butter) into breadmaker; first the wet ingredients including cooled Tangzhong, then followed by the dry ingredients.
- Select "dough" mode and let knead until all ingredients come together, usually I let it knead for approximately 8-9 minutes.
- Then add in the butter, continue kneading until the dough is smooth and elastic. Add inclusions in during the last 3-4 minutes. The total time of kneading in my breadmaker is approximately 20-25 minutes. Check if you have achieved windowpane.
BULK FERMENTATION (FIRST RISE)
- Transfer dough to pastry mat, shape into ball and let proof in a warm place covered loosely with cling wrap or damp towel until doubled in size (approx. 45-60 minutes).
DOUGH SHAPING & SECOND RISE
- Grease and line a 9×13" baking pan using baking paper with 1-2 inches overhang.
- After dough has doubled in size, punch down to deflate. Divide dough into 12 equal portions weighing approx 55-56g each.
- Take one portion and press down with palm, then gather the sides to the center forming a ball. Then using the corner of your palms at a 45 degree angle, perform chaffing method by pressing dough downwards whilst rotating dough. This helps to stretch dough to get a nice, taut round ball with smooth surface.
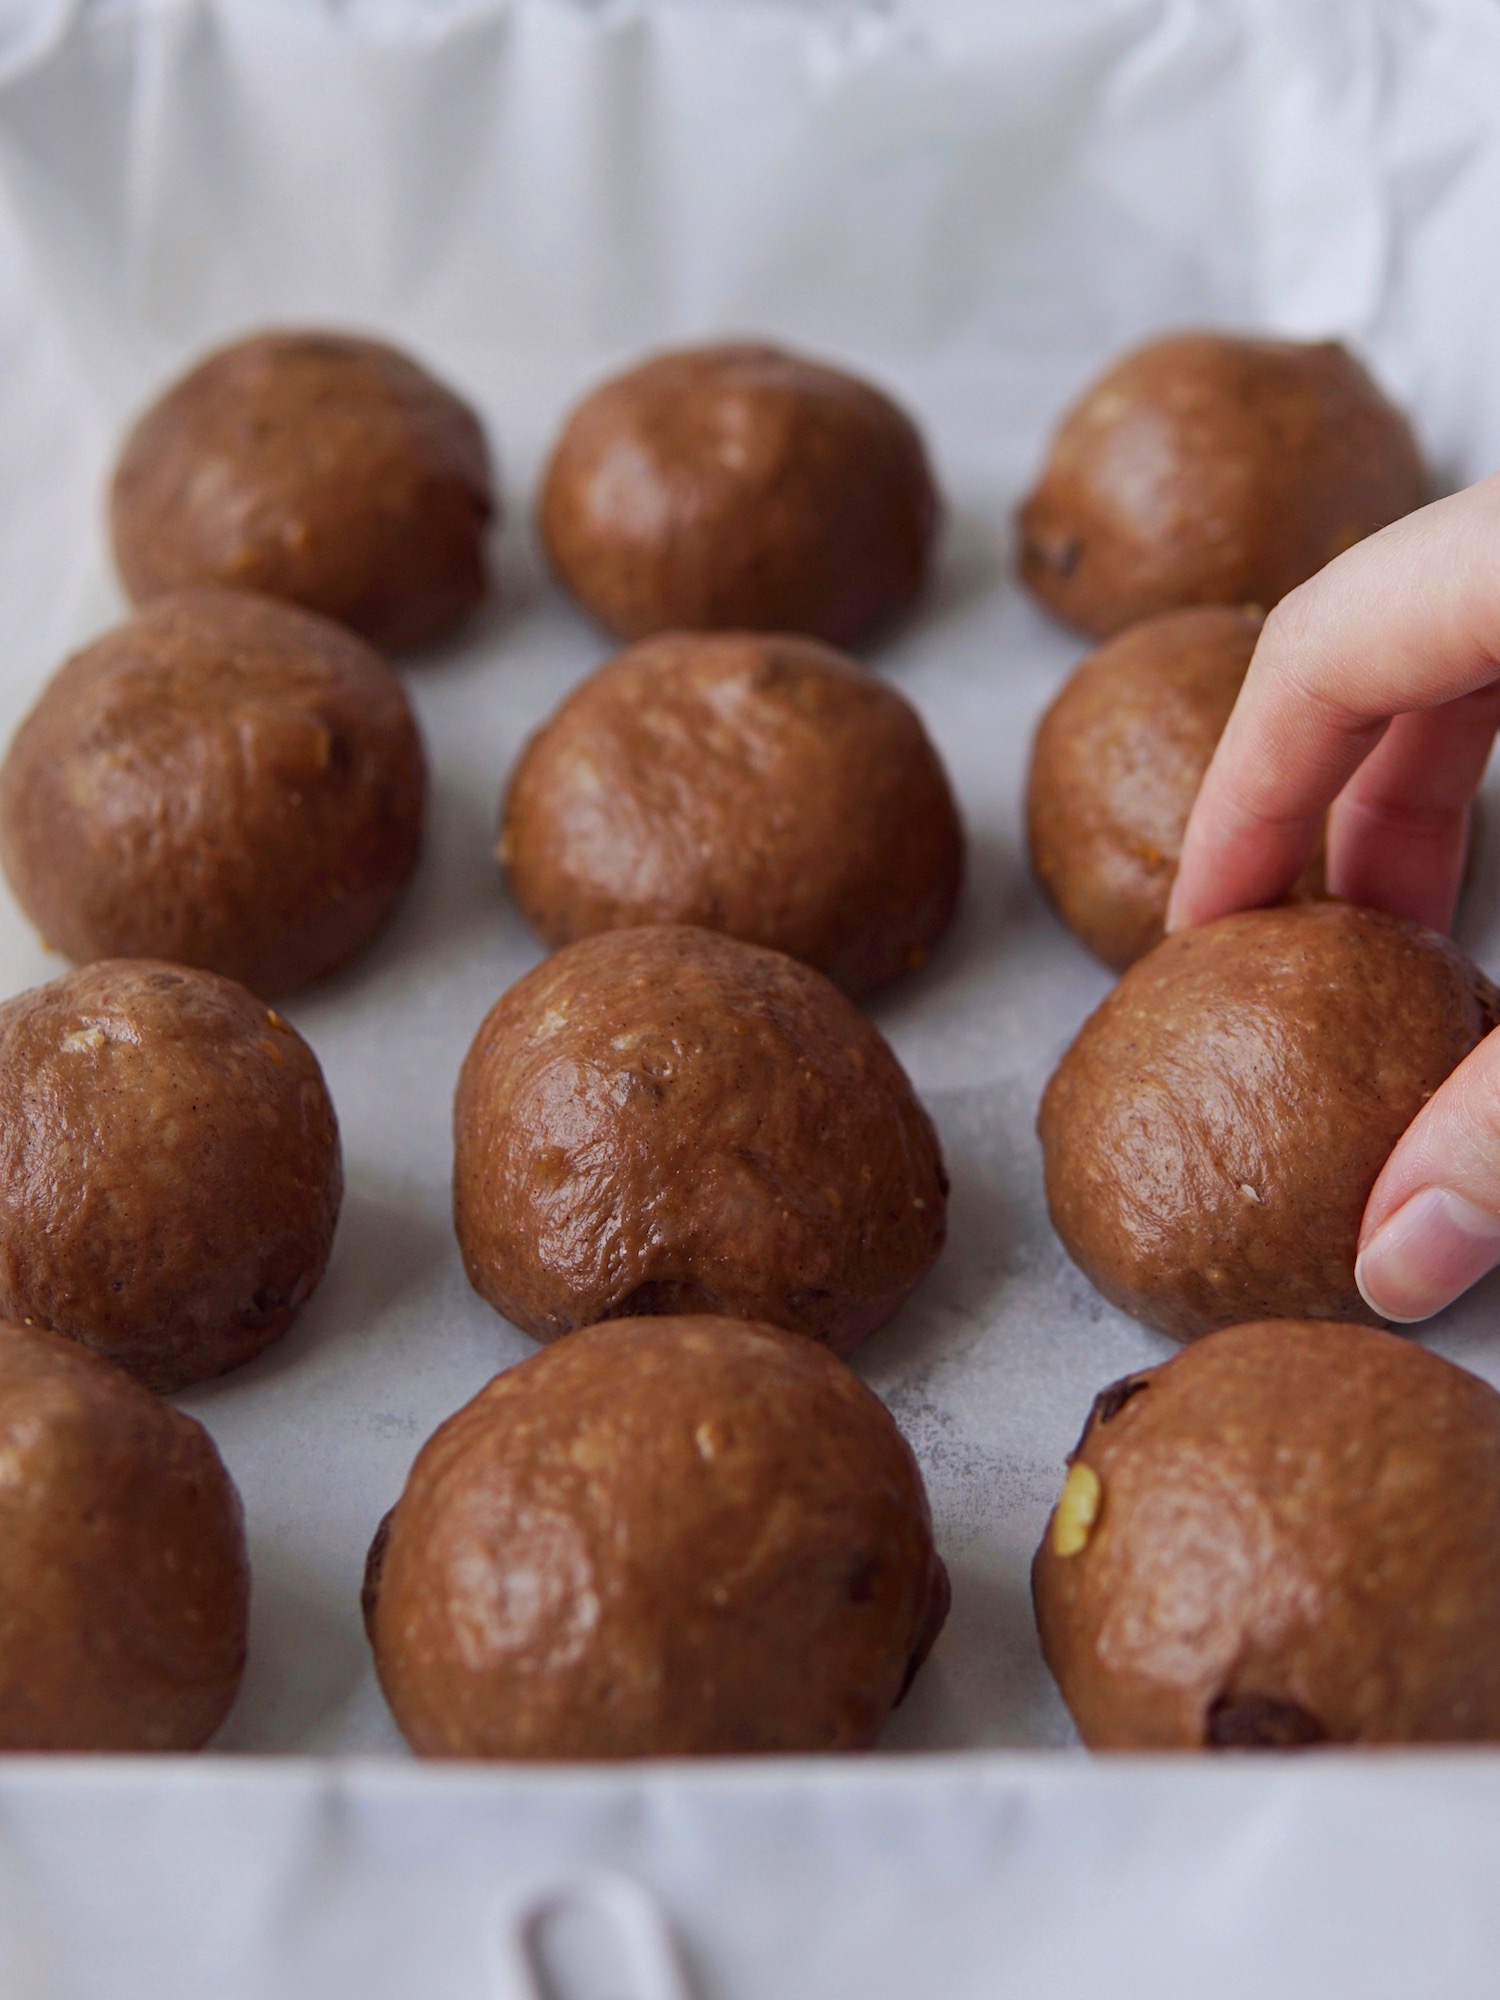
- Place the ball seam side down on the baking pan and repeat with remaining dough. Line them up 4 x 3 in the pan.
- Let dough rise for its 2nd round of proofing, until double in size. This takes another 35-40 minutes. During the last 15 minutes, preheat oven to 180°C and prepare flour paste for crosses.
CROSSES
- Mix cocoa powder, flour and water in a small bowl until a thick runny paste forms.
- Spoon into a piping bag or ziplock bag then snip off corner, approx a small 2mm-3mm round size.
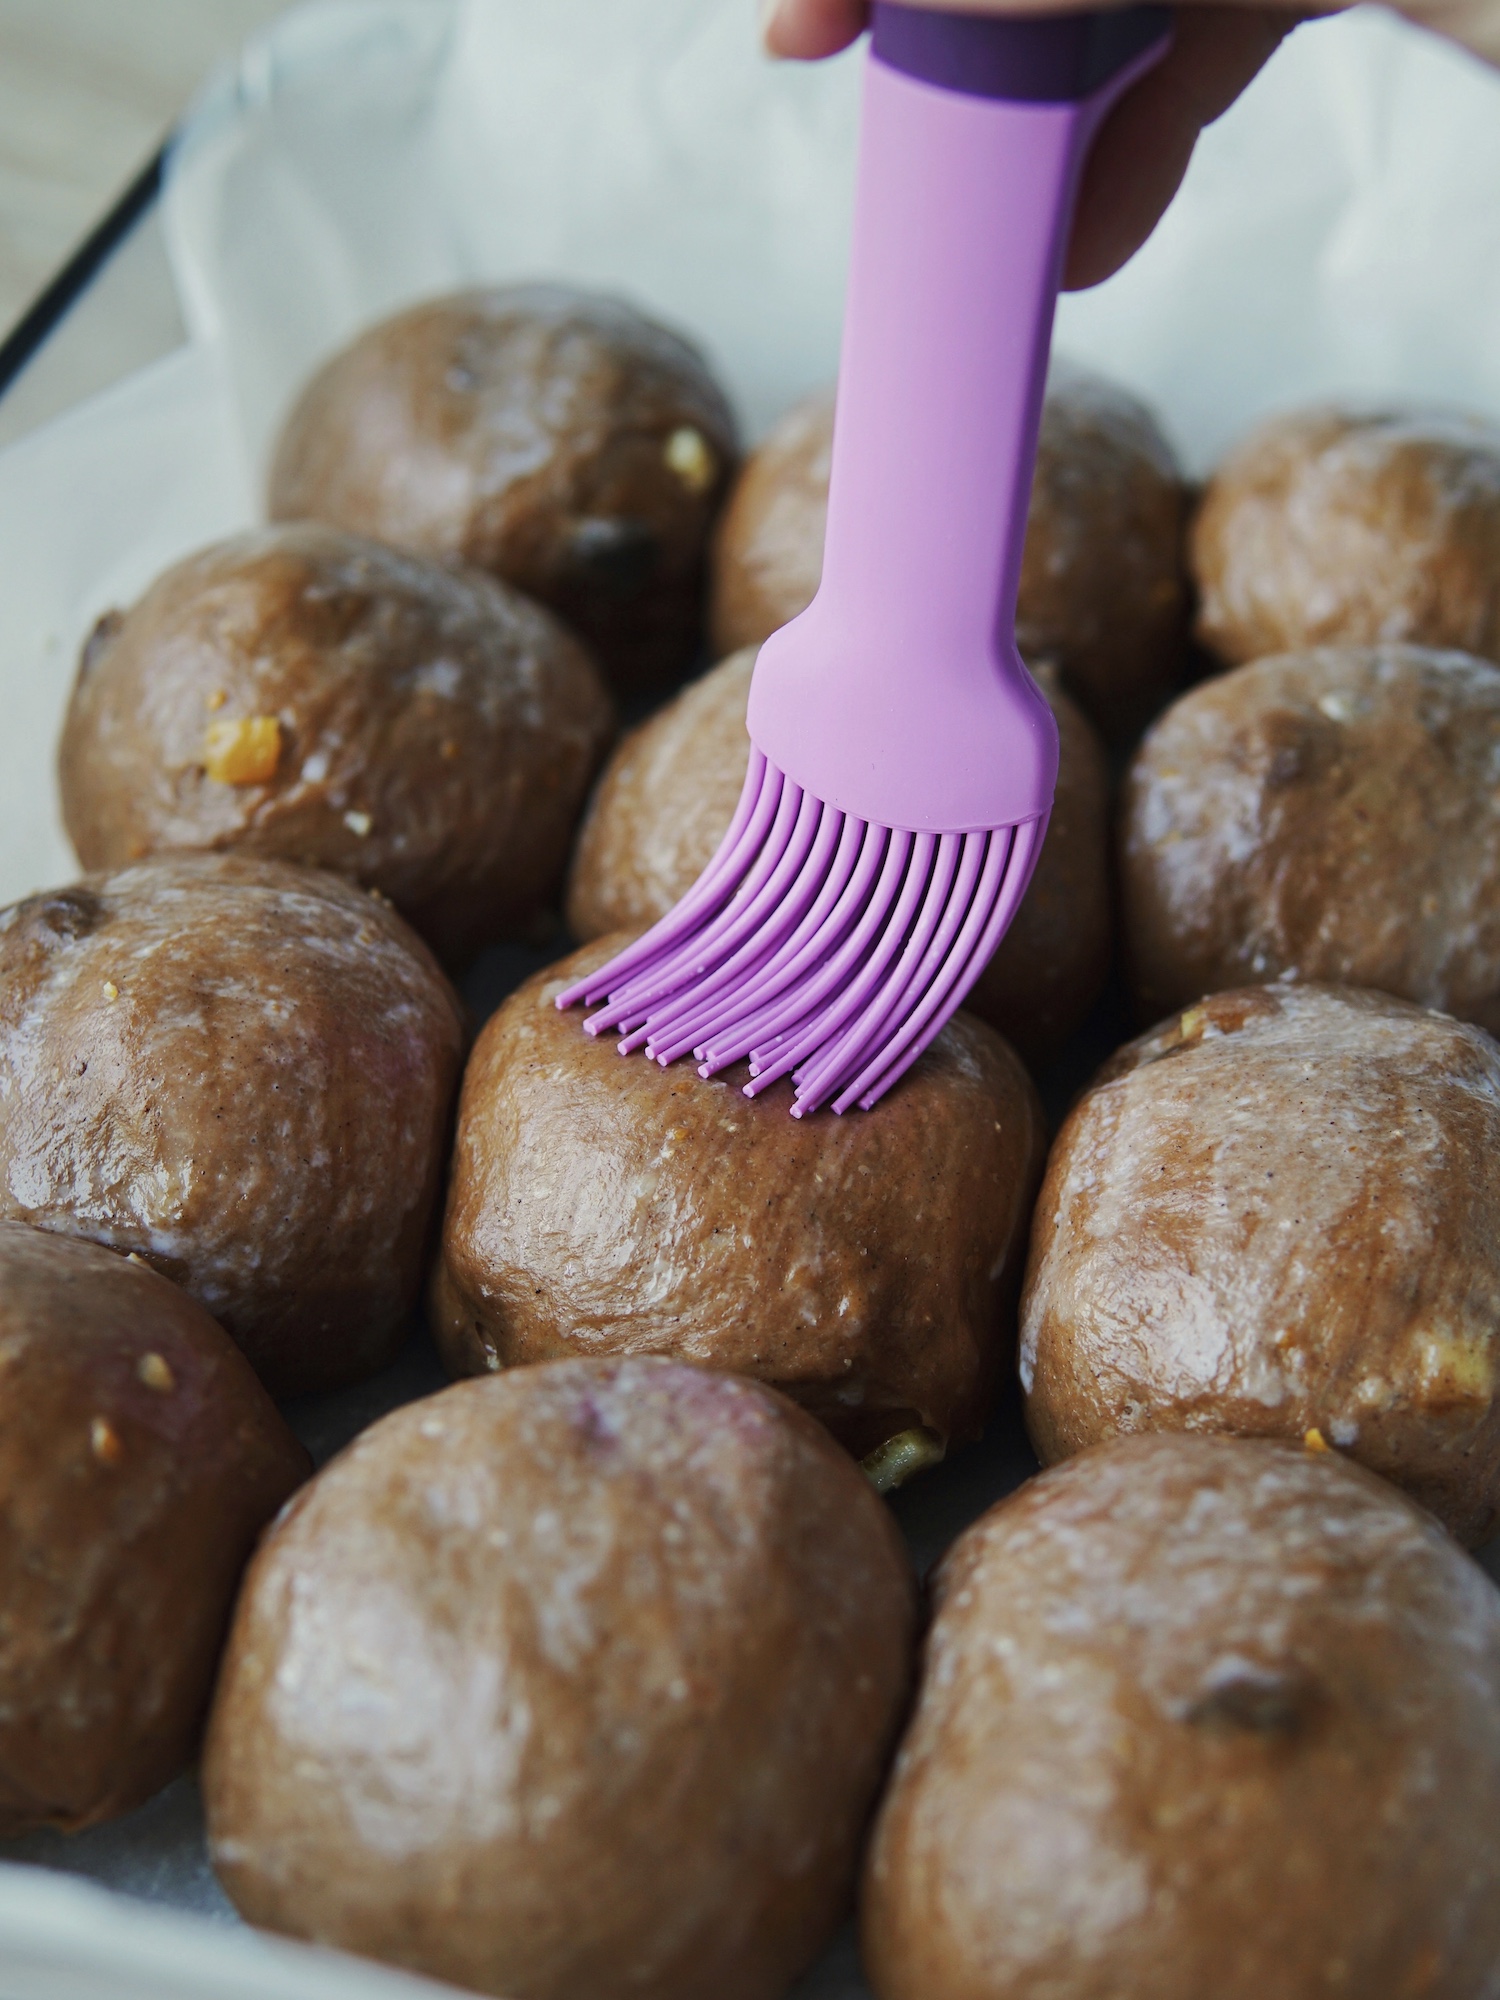
- Brush milk wash on the buns, then pipe a line down the middle of each row of buns. Repeat in the other direction to create crosses.
BAKING & GLAZING
- Bake at 180°C for 15-20 mins until golden brown.
- Whilst buns are baking, prepare sugar syrup. Combining sugar and water in a small saucepan and bring it to the boil. If using Thermomix, heat for 2 mins/100°C/Speed 3 without MC.
- Remove buns from oven. Use overhang to lift buns from pan onto a cooling rack then brush sugar glaze on buns. Let cool for 10 minutes, then enjoy warm!
- Store completely cooled buns in air tight container – they can stay in room temp for up to 2-3 days or refrigerated up to 1 week.
Notes
Tweaks & Variations
There are a few tweak options you can make to this recipe:
- If you don’t enjoy orange as much as I do, omit the orange juice in the Tangzhong and use just 100g of water and/or milk. Don’t skip the orange zest though! I would also still highly recommend including the orange peels, but you can omit.
- Not a fan of dried fruits? Swap them for chocolate chips and you’d have an indulgently rich Chocolate Chip Hot Cross Buns! Especially when the buns are warm and fresh out of the oven, ohhh those choc chips would be all gooey. Messy, but oh so divine. 😉
- If you don’t like chocolate (rare, but I believe there are some of you out there), then omit the cocoa powder and instead replace with 20g milk powder. You will get a spiced, orange infused Hot Cross Buns. You can take it further and omit the orange juice as noted in (1) above, and you will get classic Hot Cross Buns.
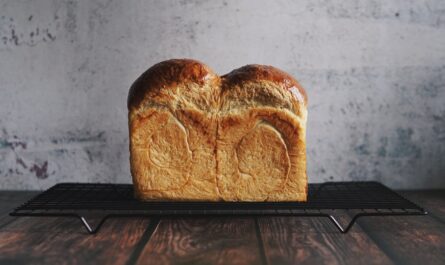
- Turn it into a loaf! After bulk fermentation, divide the dough into 8 equal pieces then shaped into round balls and arrange 4 x 2 in a 450g loaf pan. Let dough proof with similar duration of 40 minutes or until 80% to the rim, then bake the loaf at 180°C for 30-35 mins in a preheated oven.
For this particular loaf above, I did tweak #3 replacing cocoa powder with milk powder for a classic spiced Hot Cross Loaf. I also did the white cross as noted above here. I love this loaf version! It’s the convenience of being able to toss the slices into the toaster, and slather on a more generous amount of butter. I mean… Why not, right? 😉
If Experiencing Sticky Dough
For bread maker users, check the dough 10 minutes into the kneading cycle. It should be smooth and the mixing bowl should be clean by now. If your dough is too sticky to manage, you may add 1 tbsp of flour at a time.
For Thermomix users, if you experience a stickier dough, you may want to add 1 tbsp of high protein bread flour at a time and knead for 15-20 seconds until incorporated.
Lightly oil your hands (and the pastry mat depending on how sticky your dough is) using neutral flavoured oil to shape dough into a ball. Apply the chafing technique by cupping your hands gently around the dough, apply a light, downwards pressure to the sides whilst simultaneously rotating the dough in a circular clockwise motion. Continue doing so until a smooth, even, and round ball is formed. Refer to video shared in post body above.
How do I know if my bread is well proofed and ready to be baked?
You may perform the visual test to check. Lightly press the surface of the proofed dough with the tip of your finger for about 2 seconds and observe how fast the dough bounces back up.
- UNDER-PROOF: If it bounces back up too fast without any indentation, it isn’t ready yet, so give it more time.
- READY TO BAKE: It is supposed to bounce back up slowly, about halfway up and leave a slight indent.
- OVER-PROOFED: If the indent remains without bouncing back up, yes it is over-proofed, but don’t worry! You can still save it.
How to save an overproofed bread dough?
If the dough is overproofed, the gluten is being over-stretched and it will be unable to hold up the internal structure of the bread. The buns may collapse on its side. If it isn’t severely over-risen, you have the option to quickly pop it into the oven to bake it right away. Otherwise what you can do to save it is by deflating your overproofed dough and reshape, then repeat the second proofing again.
Which oven rack and what oven setting should I use?
I suggest the second rack from bottom. I bake using top and bottom heat, with fan.
Few Things to Note
When it comes to bread making, there are many factors that will influence your dough and the end product. Recipes should be used as a guide, as you familiarize yourself with the process and dough.
For instance, your dough may require extra kneading time depending on the flour and its protein content. The method used to knead also needs to be taken into account as some machines work the dough quicker, whilst others may require a bit more kneading time.
Temperature and humidity plays a big part in how your dough rises. The amount of time required to proof your dough also varies depending on where you’re based at. For proofing, if the weather is a bit chilly/cold where you are, I suggest heating up a cup of water in the microwave for 60 seconds, then leave dough inside the microwave to rise. If your oven heats up to 40°C, you may also let dough rise in oven with a cup of water.
It’s also very important to try to get to know your oven, as every oven is different. My oven heats up quickly so when a recipe calls for 180-190°C, I sometimes have to drop it down to 160-170°C depending on which rack I use. Keep an eye out as the bread is baking. Adjust either the baking temperature or duration according to how your oven behaves.
Have you tried this recipe?
Leave a comment below or tag me @thebakeanista on Instagram to let me know how you went.
IF YOU ENJOYED THIS RECIPE, YOU MAY ALSO WANT TO CHECK OUT OTHER DELICIOUS RECIPES HERE.

I came across this recipe on Instagram & after a quick read thought it was worth trying straight away since I had all the ingredients & time lol
I used a hand mixer as I don’t have a thermomix or a bread machine but found the recipe simple & easy to follow.
I was really happy with the result – the buns are pillowy soft & delicious. Will definitely make again.
Tried this recipe and buns turn out to be very soft and nice! Thank you for the recipe ❤️❤️
We tried this recipe and absolutely love it. The recipe provided options so we could tweak it to our liking. The bun isn’t as dense as the traditional hot cross buns which is good. The sugar glaze balanced the not too sweet buns so it felt like a yummy non guilty treat. Thanks Michelle 🙂
One of the best bread recipe I’ve found online! The dough was easy to handle, it rose beautifully. The buns are soft and fluffy. I like how Michelle gives very detailed instructions. I followed this recipe to the T and totally love the outcome. The orange citrusy and warm spices compliment the chocolate flavor very well. Being an avid breadbaker, i can see how versatile this recipe is. I will fill these with cocoa cream next time, to please my kids 😄. I
highly recommend this recipe!
One of the best HCB recipes ever!!
Thank you for sharing Michelle!
Soo… fluffy and bouncy! This recipe is simple yet easy to be understood and the result is really yummy😋…..
A must try recipe… 😍👍👍👍 thank you for sharing @thebakeanista 🙏🏻
I’ll have to say this is the BEST HOT CROSS BUNS RECIPE. It’s not only easy to make but taste oh so delish. Michelle, thank you for always being so generous in sharing your recipes ❤️
Great recipe. So easy with Thermomix, it’s still fully the next day and the smell is very fragrant. Michelle’s step by step detailed recipe is easy to follow. Thank you for your recipes and all the tips! Will definitely try your other recipes 👍🏻👍🏻
Great recipe. So easy with Thermomix, it’s still fluffy the next day and the smell is very fragrant. Michelle’s step by step detailed recipe is easy to follow. Thank you for your recipes and all the tips! Will definitely try your other recipes 👍🏻👍🏻
Made this with my thermomix today and boy, the smell and the shiny top buns were just too beautiful. As usual, Michelle’s recipe is always a breeze to follow and she’s always so thorough in explaning steps. Thank you always!! Bless you.
I tried this recipe and it turns out so good, love the texture and I place the leftover in airtight container in room temperature. Thanks for sharing your recipe 👍
My first time trying and I think this is probably the best hot cross bun I’ve ever had! So easy and fail proof! Thanks Michelle!
Never baked bread before and can you believe it this turned out so gorgeous, flavorful and fluffy.. Love this recipe and gonna try out other recipes soon.. Love your website and IG❤
Thank you again for your kind sharing and I am still shocked I made buns today🤣🤣
Thank you for the recipe Michelle! Finally gotta to bake this. Added both choc chips and sultana….yummmm! Your recipes are always legit, better than Cookidoo version 😃
Have a great Easter if you are celebrating!
Good recipe ! Thanks thebakeanista! Since it’s past Good Friday, i will save the cross for next year:) i topped the buns with almond nibs and glazed them with marmalade syrup water instead :), since I have the marmalade jam in the fridge 🙂 The nuts go very well with the soft & fluffy choc orange buns indeed !! By the way I halved the recipe as it was the first time I tried with TangZhong method. I am glad with the result !
Her recipe never disappoints. Cocoa n orange smells amazing ♥️♥️
First time trying a different flavor of hot cross buns instead of the classic one. Surprisingly it tastes so good! Thanks for always creating good recipes!
I chanced upon this recipe in a friend’s IG story. Decided to try it coz I’ve always wanted to bake a different kind of HCB for the kids for Good Friday.
Don’t worry about how to keep the leftover buns soft coz there won’t be any leftovers!
This one is a keeper!
Thanks Michelle!
When i saw this recipe unusual from the usual HCB recipes.. i had to try.. and true enough, it was not a disappointment… enjoyed the process of making it too. TKS 4 sharing. 😍
Thank you for the recipe.
Today I baked the classic HX loaf. I glazed it with apricot jam. Love the smell of cinnamon and citrus.
It’s a must try recipe! It turned out so good and taste amazing 🤩 Thank you for sharing the recipe!
I I tried this recipe for Good Friday but I did the original HCB version and my family loves it so much. I had to bake again on Easter. The texture of the bun is so light and fluffy.
Thank You so much for sharing the recipe Michelle…