As you would know by now, I simply love my regular white breads and milk breads. But, there is also a part of me that wants a healthier substitute and this is it. With this wholemeal bread, I get some much needed fibre, vitamins and minerals on top of the usual carbs galore.
Wholemeal bread is essentially a milled down whole-wheat grain. A grain of wheat consist of 3 layers – bran, germ, endosperm. The bran is where you get the fibre, antioxidants and vitamins. The germ houses protein, minerals and fat. Lastly, the endosperm is simply starch/carbs (which is also the tasty, sinful bit used to make our white bread).
With wholemeal, you get all the nutrition. Some may argue at the expense of taste and aroma but I beg to differ. Wholemeal CAN taste just as good.
If you have both feet firmly in camp white bread, going full wholemeal might not be the easiest of transitions. I would suggest swapping out portions of refined flour to wholemeal by the quarter. As wholemeal bread tends to be tougher and heavier, using the Tangzhong method would help counteract it a lot! As of now, I have a foot in each camp already.
Did you know that some store bought wholemeal bread have more sugar in it than white bread? This is to offset the bitterness and to make it more delicious, which defeats the purpose of a healthier bread altogether. So if you are in the mood for wholemeal bread, I would definitely suggest to bake your own.
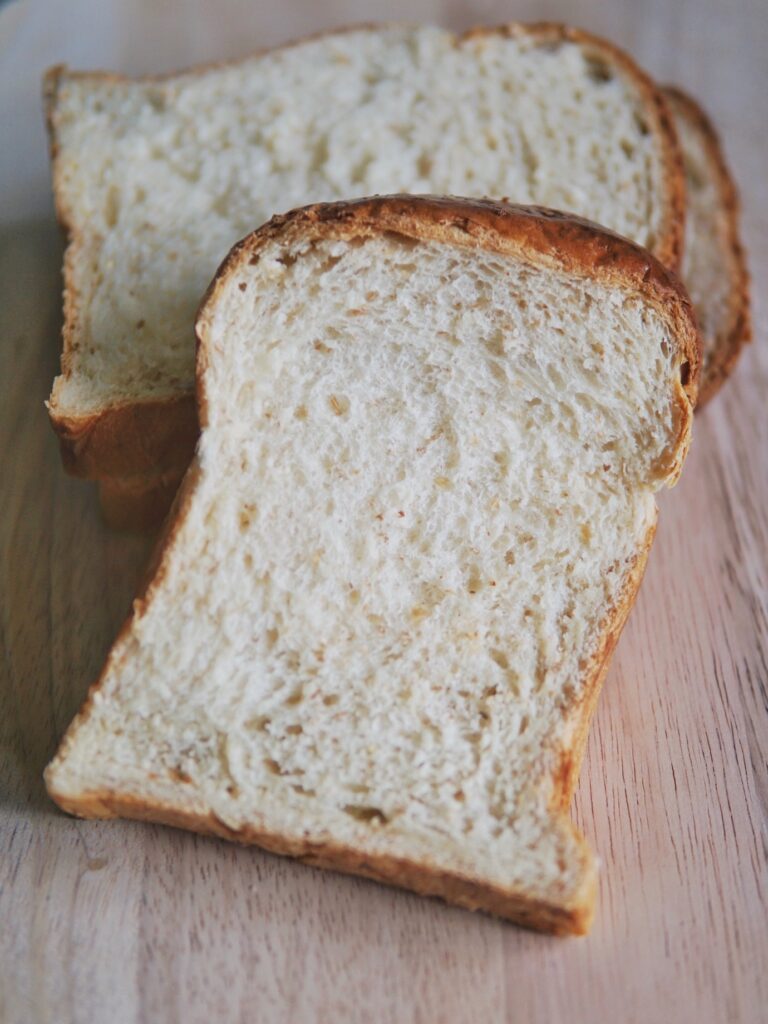
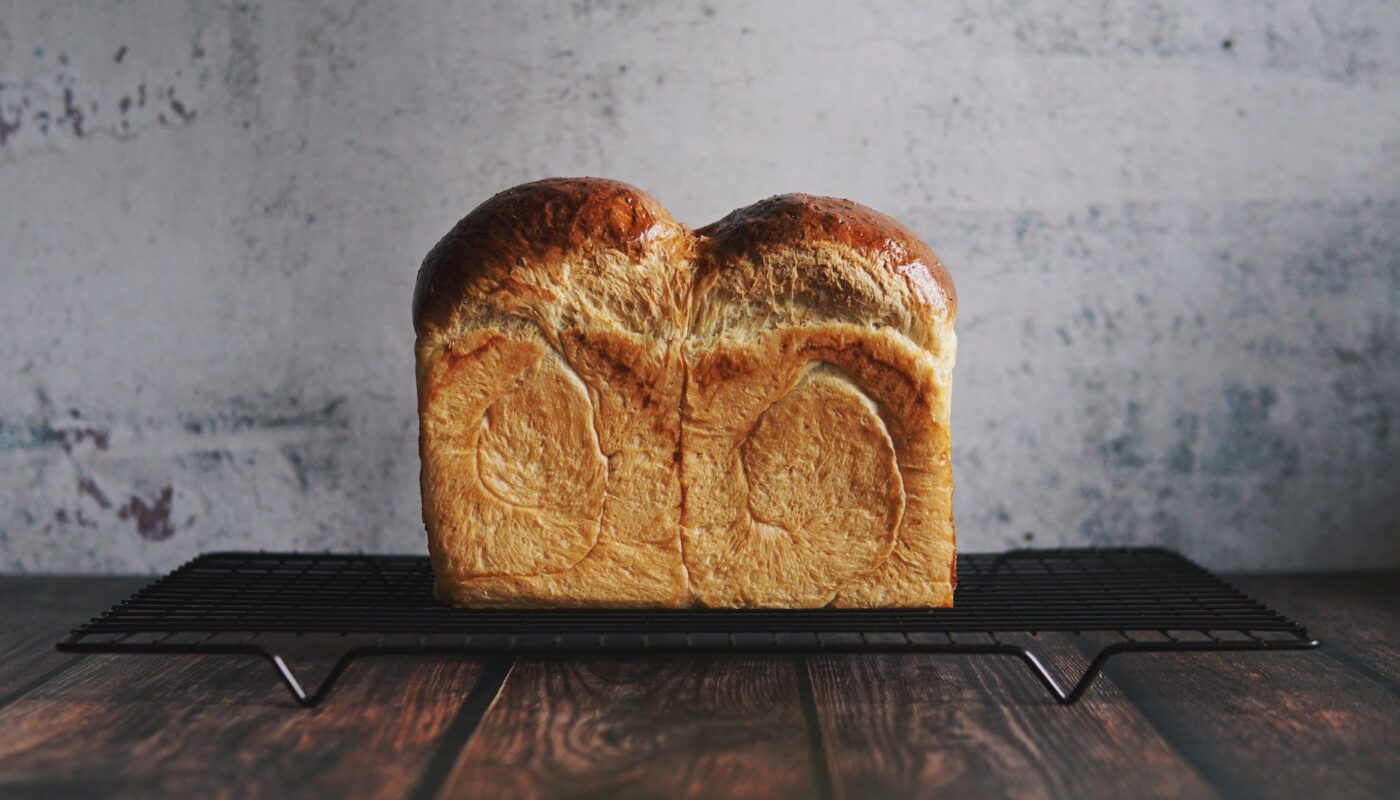
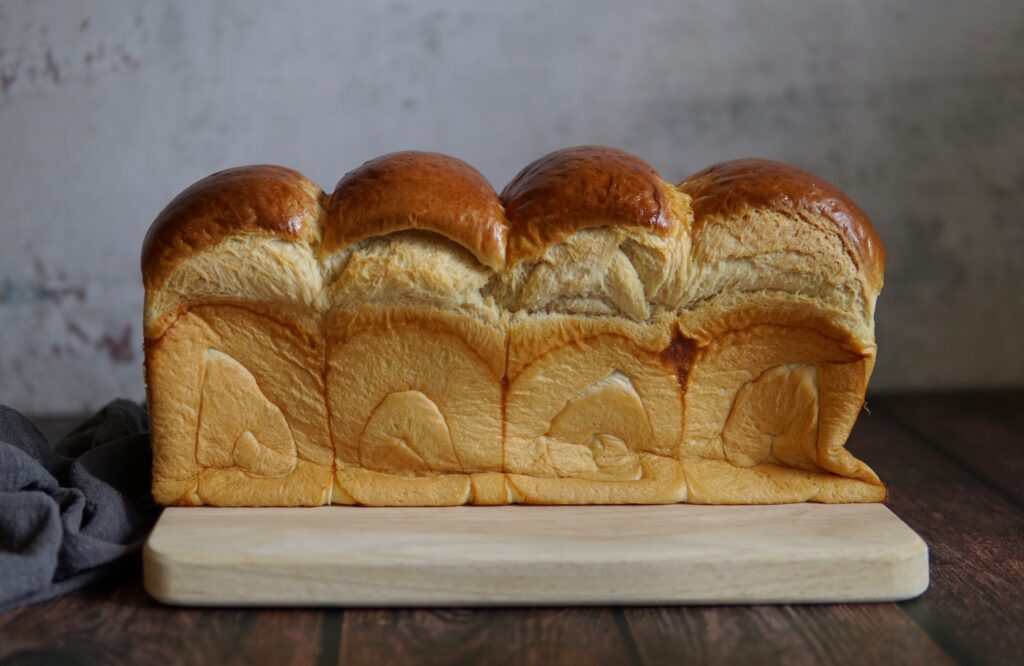
This Tangzhong 25% wholemeal bread recipe is a definite keeper and an easy one to start with. Not only is it soft and fluffy, but you get a nutty taste to your bread which goes even better as sandwiches. Once you get accustomed to it, you may go for 50-50 on the wholemeal! For that, there will be some tweaks on the ratio of certain ingredients, which I will update in time to come.
I’ve also filmed the making of this recipe sharing how I roll and shape my bread loaves. As I am still very new to video-making, I’m keen to hear your feedback so please do not hesitate to leave me a comment below.
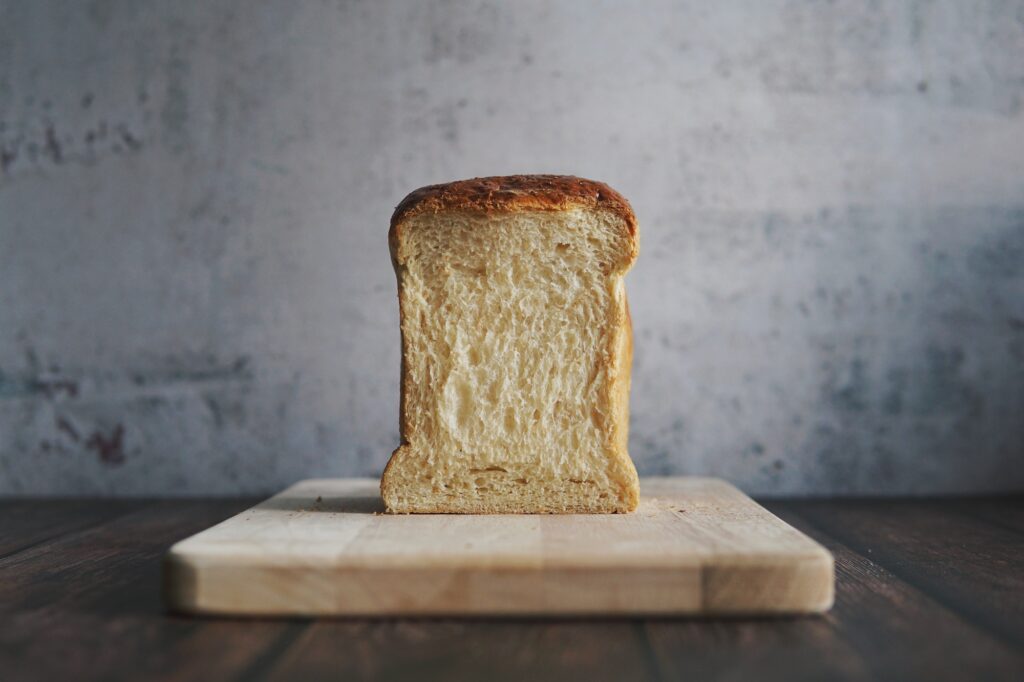
For Square-Shaped Loaf
If you wish to bake a square-shaped loaf – more suited for sandwich making, you will need a Pullman bread tin with lid. My tip is to ALWAYS ensure to grease the lid! We don’t want the bread stuck to the lid.
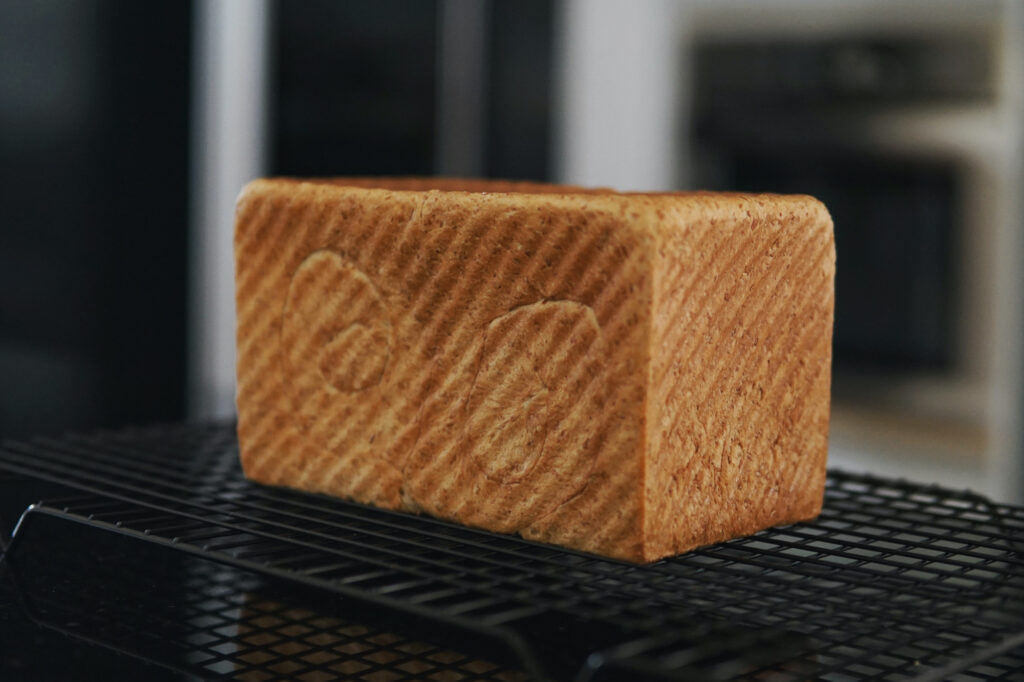
You will not require egg wash if using the lid, so at Step 5 under Dough Shaping, when the loaf is at about 80% full to the rim of the tin, I would simply put the lid on and send it straight into the oven. The dough will expand in the oven to take up the remaining space and form a square-shaped loaf.
With the lid on, the dough takes a while longer to brown so you would need a slightly higher temperature. I would preheat the oven to 190°C and bake the covered loaf for 25 minutes, before lowering down the temperature to 180°C and bake for a further 5 minutes.
Tangzhong Wholemeal Bread
Ingredients
Tangzhong
- 20 g high protein bread flour
- 100 g water
Main Dough
- 220 g high protein bread flour
- 60 g wholemeal flour
- 120 g fresh milk chilled
- 1 egg yolk
- 25 g castor sugar
- ½ tsp salt
- 1 tbsp milk powder
- 1 tsp dried yeast
- 20 g butter softened at room temp
Instructions
- Please note that I have included two methods below for tangzhong making and dough kneading using either the Thermomix or conventional bread machine so do take note of the sub-headings. If you're new to breadmaking, I also suggest you read through the notes and FAQ below the recipe.
(A) TANGZHONG – Thermomix
- Place 20g high protein flour and 100g water in mixing bowl, cook for 3min/80°C/spd 3 and let stand for 10-15 minutes until temperature lowers down to 37°C.
(B) TANGZHONG – Conventional
- Prepare tangzhong by mixing flour in water and whisk together in a pot, ensuring the mixture is well combined with no lumps. Cook over medium-low heat, stirring consistently to prevent burning and sticking while you cook.
- The mixture will gradually become thicker. Once you notice that some “lines” appear in the mixture for when you stir with the spoon, it’s done. Your tangzhong is ready.

- Transfer into a clean bowl. Cover with a cling wrap sticking onto the surface of tangzhong to prevent it from drying up. Let cool (I always let it chill in the refrigerator because I am impatient). You can pre-make the tangzhong ahead of time and store it chilled in the fridge for a few days. If you've chilled your tangzhong, ensure to return it at room temperature first before using.
(A) MAIN DOUGH – Thermomix
- Add milk, egg yolk, sugar, salt, milk powder, remaining high protein flour, wholemeal flour and yeast then knead 4min.
- Add butter, knead 1min.
(B) MAIN DOUGH – Conventional
- Add all ingredients (except butter) into breadmaker; first the wet ingredients (egg, milk, tangzhong), then followed by the dry ingredients (sugar, salt, flour, milk powder, yeast).
- Select "dough" mode and let knead until all ingredients come together, usually I let it knead for approximately 8-9 minutes.
- Then add in the butter, continue kneading until the dough is smooth and elastic. The time of kneading in the breadmaker should take approximately 23-25 minutes.
PROOFING & SHAPING
- Transfer dough to pastry mat, shape into ball. Let proof in a warm place covered loosely with clingwrap/damp towel until doubled in size (approx. 45-60 minutes).
- Punch down dough to deflate. Divide dough into 2 or 3 equal portions and roll into a round shape – let rest for 10-15 minutes so the dough will be easier to handle.
- To shape each mini loaf, flatten a ball into a long oval shape. Fold 1/3 from right edge to the middle and press. Fold 1/3 from left edge to the middle and press lightly. Roll it out slightly and roll into a cylinder.
- Arrange dough logs, seam side down in a bread loaf tin (I am using a 450g Pullman Loaf Tin 8x4x4") and let proof for approx 40 minutes until dough fills up 80% of the tin. Ideally, the best temperature for 2nd round proofing is at least 30°C to 38°C. On days when it's cold, you can heat up a cup of water in the microwave for 30-40 seconds then proceed to leave your dough inside the microwave to rise. During last 15 minutes, preheat oven to 180°C.
- Spray dough with icy cold water / or egg wash and bake for 25-30 minutes at 180°C until golden brown. Remove milk bread from tin and allow to cool completely on a cooling rack for at least an hour before slicing and serving.
Notes
- For TM users, increase kneading time to 5mins at step 2 and 1.5 mins at step 3.
- For BM users, please note that as I have a smaller machine, it wasn’t able to handle double portion to ensure that dough is well kneaded – I let dough knead for 13-14 minutes at step 1 with lid open, stop the machine, and restart Dough mode. Add butter and let cycle finish. Total knead time around 30-35 minutes with bread machine.
Few Things to Note
When it comes to bread making, there are many factors that will influence your dough and the end product. Recipes should be used as a guide, as you familiarize yourself with the process and dough.
For instance, your dough may require extra kneading time depending on the flour and its protein content. The method used to knead also needs to be taken into account as some machines work the dough quicker, whilst others may require a bit more kneading time.
Temperature and humidity plays a big part in how your dough rises. The amount of time required to proof your dough also varies depending on where you’re based at. For my second proofing, I usually heat up a cup of water in the microwave for 1 minute, then proceed to leave my dough inside the microwave to rise for 25-30 minutes.
It’s also very important to try to get to know your oven, as every oven is different. My oven heats up quickly so when a recipe calls for 180°C, I sometimes drop it down to 160-170°C. Keep an eye out as the bread is baking. Adjust either the baking temperature or duration according to how your oven behaves.
FAQ
Can I use whole egg instead of just the egg yolk?
By using just egg yolks, we are adding fat, richness and flavour to the bread. The fats from the yolk works to tenderise the crumb and lighten the texture which gives our loaf a rich and soft crumb. You can use the whole egg if you like, but you will have to adjust the recipe accordingly or you’d be adding too much hydration with the addition of the egg whites as well.
Can I omit milk powder?
You may opt to omit the milk powder but I wouldn’t recommend it. Milk powder adds fats, protein and flavour to the dough, that not only makes the dough richer and creamier in taste, but also helps dough rise higher. The addition of milk powder will also help yield a more tender crumb texture.
Help! My dough is too sticky!
For bread maker users, check the dough 10 minutes into the kneading cycle. It should be smooth and the mixing bowl should be clean by now. If your dough is too sticky to manage, you may add 1 tbsp of high protein bread flour at a time.
For Thermomix users, if your dough is still too soft to handle, add 1 tbsp of high protein bread flour at a time and knead for 15-20 seconds until incorporated.
Lightly oil your hands (and the pastry mat depending on how sticky your dough is) using neutral flavoured oil to shape dough into a ball. Apply the chafing technique by cupping your hands gently around the dough, apply a light, downwards pressure to the sides whilst simultaneously rotating the dough in a circular clockwise motion. Continue doing so until a smooth, even, and round ball is formed. I shared a video of how I perform this technique saved on my Instagram Story highlights.
How do I know if my bread is well proofed and ready to be baked?
You may perform the visual test to check. Lightly press the surface of the proofed dough with the tip of your finger for about 2 seconds and observe how fast the dough bounces back up.
- UNDER-PROOF: If it bounces back up too fast without any indentation, it isn’t ready yet, so give it more time.
- READY TO BAKE: It is supposed to bounce back up slowly, about halfway up and leave a slight indent.
- OVER-PROOFED: If the indent remains without bouncing back up, yes it is over-proofed, but don’t worry! You can still save it.
How to save an overproofed bread dough?
If the dough is overproofed, the gluten is being over-stretched and it will be unable to hold up the internal structure of the bread. The wall will highly likely fall after baking and the loaf would then collapse. If it isn’t severely over-risen, you have the option to quickly pop it into the oven to bake it right away. Otherwise what you can do to save it is by deflating your overproofed dough and reshape, then repeat the second proofing again.
Which oven rack and what oven setting should I use?
I suggest the second rack from bottom. I bake using top and bottom heat, with fan.
When to remove bread from tin?
Upon removing from oven, immediately remove it from the bread tin and let cool on a wire rack. This step is crucial in ensuring there is proper air circulation and that condensation does not happen causing your bread to get wet/soggy at the bottom.
Should I cover the bread as it cools?
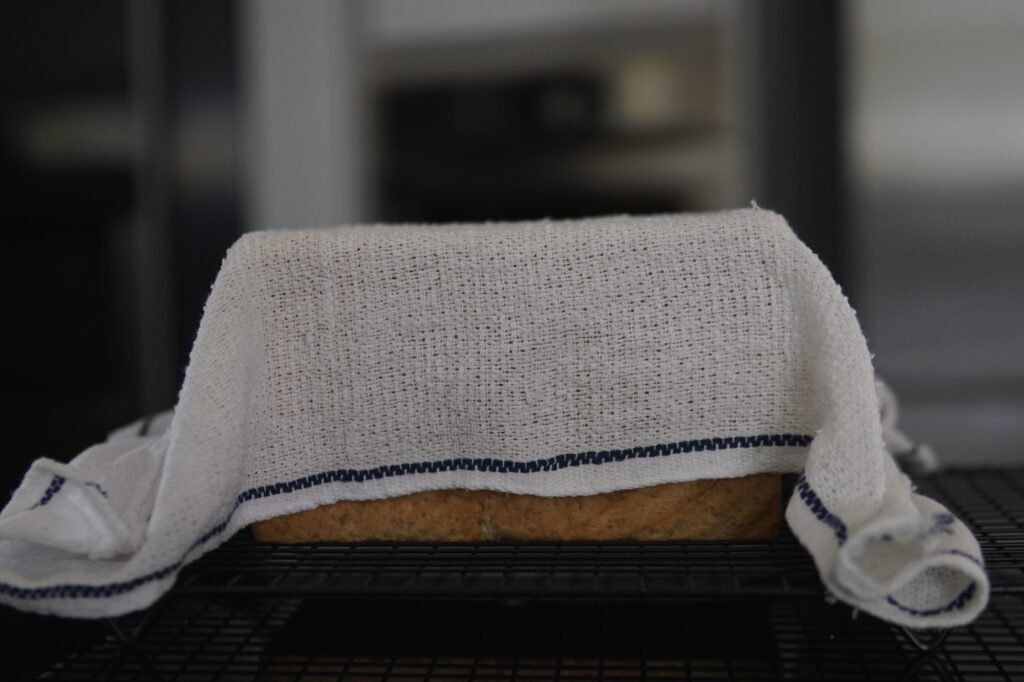
It isn’t necessary to do so. By covering with a cloth, the cloth captures the steam that makes its way outwards and acts to soften the crusts. If you prefer crust with more of a bite, then there’s no need to cover the loaf.
When do I slice the bread?
Of course, I understand how hard it is to resist freshly baked bread. But! Slicing into your loaf of bread before it has cooled down completely may sometimes result in wet gummy crumb texture. Always let your bread rest for at the very minimum 30-60 mins, best for 1.5-2 hours. Just like how you would rest your meat after cooking, the same theory applies for your bread. By allowing your bread to cool completely, it helps stabilise the crumb structure.
Once it has completely cooled down, you may store entire loaf and slice only when you wish to consume. This is because the longer you rest it, the easier it will be to slice the bread. If you’re finding it tricky to slice a loaf of freshly baked bread, check out my video below on how I slice soft loaves:
Oh no! My Tangzhong Milk Bread caved in at the sides after baking. What should I do?
Unfortunately there is nothing we can do to save a bread that has caved in and collapsed. But you could take note of a couple of things that may have potentially caused this and ensure the same does not happen for your next loaf. The collapsing is a result of the exterior wall being too weak to support the structure. There are two reasons that may have caused this:
1) Your bread may potentially be under-baked. Try baking it a little longer to set the wall but if it is browning too much, you could tent the top with foil or baking paper. Alternatively try baking it at a higher temperature during the first 1/3 of the baking time then drop the temperature to finish cooking for the remaining 2/3 of baking duration.
2) Sometimes the bread would also cave in if the dough was over-proofed during second proofing as the whole structure is too weak to support the entire tall loaf. I suggest setting a timer less than the duration you intend to let it proof so you have time leeway. Perform the visual test if need be.
How to store bread?
Ensure to store bread in airtight container or ziplock bag so the bread can stay soft and last for up to 2-3 days at room temperature.
What do I do with leftovers that I can’t finish in 2-3 days?
If you are unable to finish within the first 2-3 days, it is best to store your bread in the refrigerator since there is no added preservative. Without preservatives, our homemade bread will not stay as soft and fresh as other commercial loaves beyond 3-4 days. Before consuming though, you may want to either toast/steam/microwave.
Perhaps if you would like some fun ideas on what to do with your leftovers, check out how to make Monte Cristo Sandwich – complete with mukbang at the end too! 😉
Have you tried this recipe?
IF YOU MADE THIS RECIPE, I’D LOVE TO SEE HOW IT WENT!
TAG ME ON INSTAGRAM @THEBAKEANISTA SO I CAN HAVE A LOOK AND RE-POST ON MY IG STORIES!
If you enjoyed this recipe, you may want to check out my RECIPE INDEX for other delicious recipes.
This is the first recipe of yours I tried and I must thank my good friend Genevieve for her recommendation. I’ve tried many other tangzhong wholemeal bread recipes and yours is the best! I stopped trying others ever since 🙂
That is one huge compliment! Thank you June for the kind words and for loving my recipes. ❤️
finally I have found a recipe that’s easy and precise enough to follow! Just made it today and it was super fluffy and soft and my baby daughter absolutely loved it and kept asking for more!! Thanks and please keep up the good work! Looking forward to the 40 -50% wholemeal loaf!!!
Thank you B, so glad to hear your daughter enjoyed your soft & fluffy bread! Working on the next update – stay tuned. 🙂
Thank you Michelle for this recipe with clean and neat instructions~ First try on this wholemeal bread recipe and it turned out wonderful! Hand kneaded the dough and the bread came out doing yoga, so soft and fluffy! Looking forward to more of your creation!
Woohoo!! Bread doing yoga is definitely a sight we all love, don’t we? Thank you for trying, I’m so glad to hear it turned out well for you.
Thank you v much for sharing . Indeed it’s the best soft bread recipe I hv ever come across. Amazingly soft the next day too. Using TM was such a breeze with yr recipe. Love it. Thks once again
Thank you Vivienne for the lovely feedback! So happy to hear it has worked out well for you too. How amazing is the TM – all kneading done so quickly! 🙂
Have you updated your 50% wholewheat bread?,since i want to know the recipe
Thanks for checking in. It’s a work in progress not ready to be shared yet.
Incredibly soft and rich, reminded me of the local Massimo Bread
Made this with Dutch Lady Milk Powder as that’s all I had on hand in terms of milk powder and a combination of standmixer + traditional hand kneading.
Had found your blog after coming across your beautiful purple ube loaf and am now addicted to your feed, definitely recipes to keep
Thank you so much Michelle :))
Hehe soft like Massimo but better and without preservatives! 😉 Thank you for your kind lovely words.
This is seriously a very good recipe. I made me first loaf of soft and fluffy wholemeal bread this morning because of your selfless sharing. Thank you so much.
My absolute pleasure Amanda! I’m so glad to hear it turned out well for you.
Best recipe.. thank you for sharing all in detailed steps and tips..
So glad to hear, Mega! Thank you for taking the time to drop me such lovely feedback. 🙂
I do this bread almost once every week! In love it it! Thanks Michelle!
Pleasure is mine!! ☺️
I made this using my Zojirushi bread machine (increased the ingredients by 50%) and it turned out beautifully! So delicious!!! Thank you for sharing your talents with us. ❤️
Thank you Kathie for sharing with us! Good to know that this recipe works also for direct baking in the bread machine. That’s useful insight for those who are pressed for time and do not want to remove to manually shape.
This is seriously a very good recipe and I love it so so much. I made me first loaf of soft and fluffy wholemeal bread today and I feel so proud of myself for making this, all because of your selfless sharing. Thank you so much 🙏
I’m so glad to hear that I’ve inspired you to attempt your very first loaf! Thank you for sharing this with me and for your lovely feedback. 🙂
This is seriously a very good recipe and I love it so so much. I feel so proud of myself for making such a soft and fluffy wholemeal bread for my family, all because of your selfless sharing. Thank you so much 🙏
Hi , cook for 3min/80°C/spd 3 and let stand for 10-15 minutes until the temperature lowers down to 37°C. this part don’t understand lower down to 37?
Hi Sally, on the TM31 it indicates the temperature of the TM. After cooking the Tangzhong until it reaches 80deg, let it cool for 15-20 minutes until the machine indicates that the temp is at 37-40deg. I’m not sure what machine you’re using and how it indicates, but all TM should indicate the temp when use.
Thank you for sharing your fabulous bread recipes
Pleasure is mine! 🙂
Love your videos and thank u for the detailed steps. Very helpful indeed.
After the dough is removed fr the thermomix, do u have a video that shows step 1?
Your video only shows step 2 onwards right?
Would be great to watch step 1 “Transfer dough to pastry mat, shape into ball and flatten with rolling pin and fold to wrap dough ball loosely into an envelope shape. “. Coz not sure what you mean by wrapping dough ball into envelope shape. Thanks
Hi Cherry! Thank you for your feedback. I no longer shape into envelope as i found this step unnecessary – so I only shape into a round ball and let it proof.
You can refer to this video for a similar bread that covers start to finish: https://youtu.be/_SfnY-B88_o
Used your recipe to bake my first bread and it came out perfectly!!!! Thank you for the really detailed steps and your videos are great 🙂
I really like the bread and am thinking to make double portions the next time.
If I am using TM5, do you recommend for me to just double the ingredients and split out into 2 tins? Will the kneading be compromised?
To double the recipe, you may use 2 x 450g loaf tin pans. As for the TM, increase kneading time to 5min at step 2 and maintain at 1 min at step 3.
Hi,
I have been using your recipe for my routine bread baking. Thanks for the detailed and generous sharing.
However, I have experienced twice that the bread turned “unpleasant sourly yeast smell” after 1-2 days! When I checked on the bread, it has tiny moldy spots on it. Do you know why?
Hi Lay Yah, thank you for your kind words. My Tangzhong loaves usually stays soft and fresh for up to 2-3 days.
One thing to ensure is that the bread has completely cooled down, then store in air tight container.
If the bread is still warm when stored, this could result in condensation and thus leading to mould to grow on your bread.
I see. Thanks for replying! 😘
LOVE YOUR BREAD ❤️❤️❤️. Truly so kind of you to share so generously. What a kind soul you are. I bake your Tangzhong bread almost every two to three days and they always turns out perfect! Thank you so much. God bless you.
Now looking forward to try your other bread recipies. 😍
Thank you Janette for your kind words! Means so much to me. So glad that my sharing has benefitted you and many others. ❤️
I’ve made this recipe about three times and it has turned out great every time. this recipe is super full proof and the spread comes out soft and fluffy each time. the family loves it.
Hey Michelle, thank you for your lovely recipe. Although my first baked loaf was slightly undercooked it was still edible and flavours were awesome. Will try to make it again. Also, thank you for your quick reply and sharing.
Am looking forward to more interesting recipes.
I love this recipe so much.. the bread turned very soft and fluffy…
This is my favourite bread recipe. Michelle’s recipe and video sharing are very useful, especially for novice like me.
easy to follow, and the outcome is awesome.
looking forward more sharing from Michelle.
Hi Michelle, you mentioned that we can make 2 portions in the TM by doubling the ingredients. Do I double the tangzhontg as well?
Thanks
Yes you will need to double all ingredients, including the Tangzhong.
Hi, can this made into buns instead of loaf?
Yes of course! You can refer to the steps here for shaping into buns: https://thebakeanista.com/eggless-sugar-free-wholemeal-bread/
Incredibly soft
I have been using your recipe,Incredibly soft . Thanks for the detailed and generous sharing.
I’m glad you enjoy the recipe and that it works well for you!
super soft despite it’s wholemeal bread! love the detailed recipe with video guidance!
Like so much the recipes that you posted, after seeing your post my tm31 just awoke from hibernation!!! Thanks much!!! ❤️ ❤️ ❤️
Woohoo!! Nothing quite like reviving an white elephant in the kitchen; hope you will continue to use your TM to explore more recipes! 🙂
Hi Michelle, thank you for this recipe, done it many times and sometimes I will add in seeds or chocolate chips!
Btw do you have an update on the 50% wholemeal recipe?
Glad to hear that! Regarding that update, I am not quite satisfied with the 50% wholemeal that I’ve tried so far, and have continued using this recipe, or up to 35% at most.
Awesome soft and bouncy wholemeal bread! My 2yo loves it so much. Thank you for sharing the detailed recipe Michelle ❤️
Super love this recipe. After making it, i always prefer to bake my own than buying it from bakery. Thank you so much for sharing.
Thank you so much for the recipe!!
Easy step to follow.. perfect texture n taste DELICIOUS!!!!
Please post more recipe : )
My forever go to recipes website!
Have a small family. For smaller portions e.g. half of it, do I simply halve the ingredients? Can’t wait to start!
You most definitely can! But if I were you, I’d rather bake the full recipe and freeze extras. They keep well in the freezer. 😉
Thanks for your detailed instructions. I cannot believe that it’s so easy. I kept putting it off but I braved it today. OMG it’s so soft n fluffy. We ate a piece after cutting it. So soooooo soft n yummy. Thanks a million.
I’m so so so so glad to hear that! 🙂